General information
frokost Version: 1.0Created: 12/04/2016
Created by: XpeedStudio
Any Advice?: Send message from contact form
Need Help ? Open support ticket in our Support Center
Thank you for purchasing our theme. If you have any questions that are beyond the scope of this help file, please feel free to open support ticket in our support forum . Thanks so much!
Introduction and quick start guide.
Thank you so much for purchasing our theme called frokost - WordPress Theme. Please feel free to contact us if you have questions or problems about this theme. No guarantee is provided, but we will do our best to provide you with the best possible assistance.
First Step
- Documentation - That's where you
- License - Some info's about theme licencing terms
- Dummy Content - Placholder content for testing the theme
- SampleData - Import Data to get the exact Site as the Preview Page
- Upload - This is where all Theme files are (zipped & unzipped format)
What are Parent and Child Themes?
A WordPress child theme takes the functionality of another theme, named parent theme. It gives you the possibility to customize an existing theme. Instead of modifying the theme files directly, you can activate the child theme and work within it.
All customizations are stored in the child theme and anything in the child takes priority over the parent. So if the same file exist in both child and parent, the file from the child will control that aspect of the theme.
Working with child themes, your customizations are safeguarded from future upgrades because you only upgrade the parent theme, which you never edit, while the customizations are protected in your child theme which you don’t upgrade.
Why use a Child theme?
Safe Updates. You can easily modify your website using child themes without ever changing the parent theme. When a new version of the parent theme appears, you can safely update it as all your modifications are saved in the child theme.
Easy to Extend. A child theme has a great flexibility. It does not require writing a lot of code. You can modify only those template files and functions that you need.
Install Theme
The first option how to install this Theme would be to directly upload the basquito.zip file via WordPress Theme Uploader.- FTP Upload:
- Unzip the "frokost.zip" file from theme folder
- Open up your FTP manager and connect to your hosting
- Browse to wp-content/themes
- Upload the frokost in theme folder
- Log Into WordPress and go to Appearance > Themes
- Find the frokost Theme and click activate
- Wordpress Upload:
- Log into your WordPress backend
- Navigate to Appearance > Themes
- Click Install Themes
- Click Upload
- Now you just need to find the "frokost.zip" in the Upload folder and hit Install now.
- After complete installation click on active button to active The theme.
If you are experiencing any issues during the installation I would recommend to check out this
Plugin Installation
If installation was successful, you'll see a notice about required plugins for frokost, This theme requires the following plugin: Unyson.
to proceed click "Begin installing plugin".
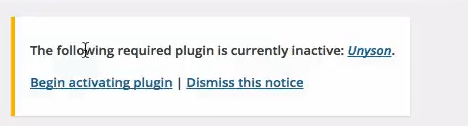
Just click the Begain installing Plugin and it will move to install page. Install the plugin. then active the plugin.
After Active click return to dashboard
Next page will see Plugin extension list
click Install Thes extension all extension will be installed
Screencast
Installation Screencast
Here's All of our screencast:
https://www.youtube.com/channel/UCJp-j8uvirVgez7TDAmfGYA
Theme Setup
frokost is an Simple and Nice one page Wordpress theme. After setup the theme we need to configure some option in our Backend. We will do it step by step
You can install frokost theme two ways. one normal process, another one click installation with demo data
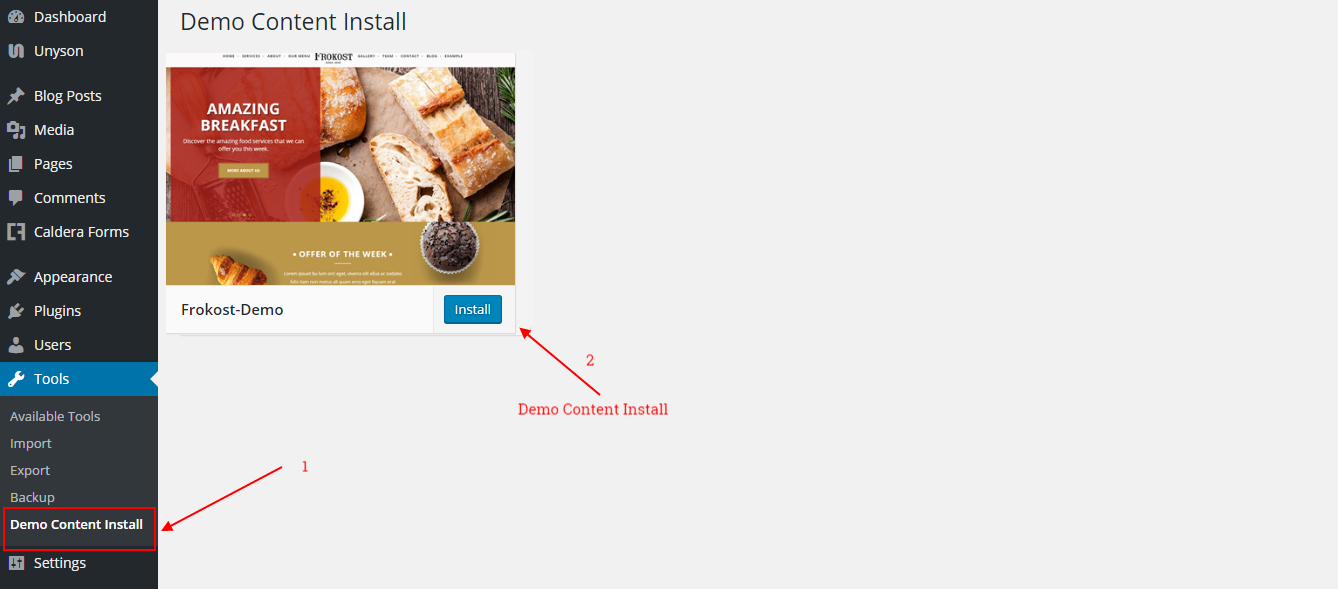
Install with Sample Data (one click Install)
You can install sample data with one click installation.
1. frokost provide oneclick sample data installation facility. To install sample data via theme option navigate Tools -> Demo Content Install ->. Click on Install button what you want and wait. it will take several min.
Install with Normal process
Make sure you have upload your theme via appearance-> themes or via ftp. and Active the theme
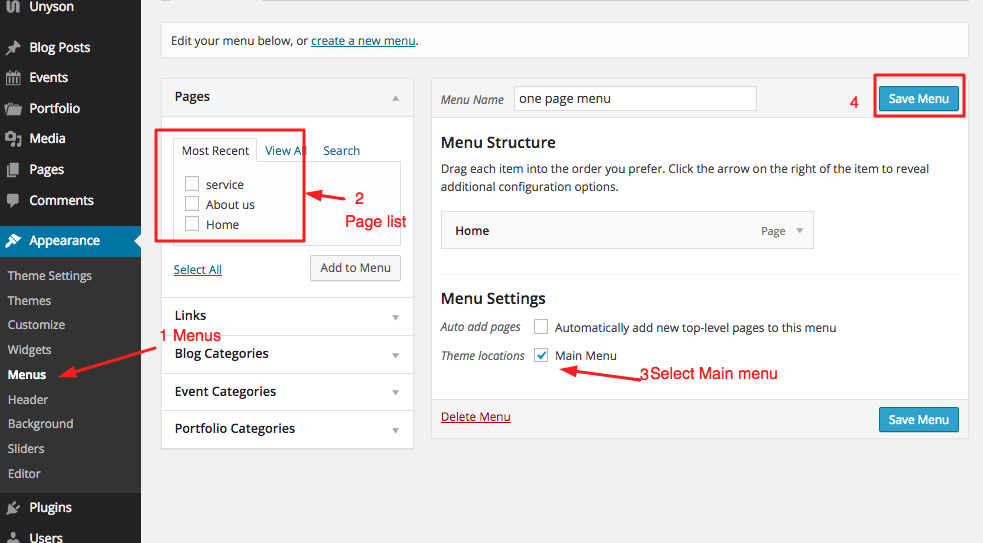
Create a page called Home from left sidebar.. Pages-> add new
- Page name: Home
- From right side bar Page Attribute: Select Template Homepage Template
- From editor bottom. This page is a section:? YES
- Then Save the page

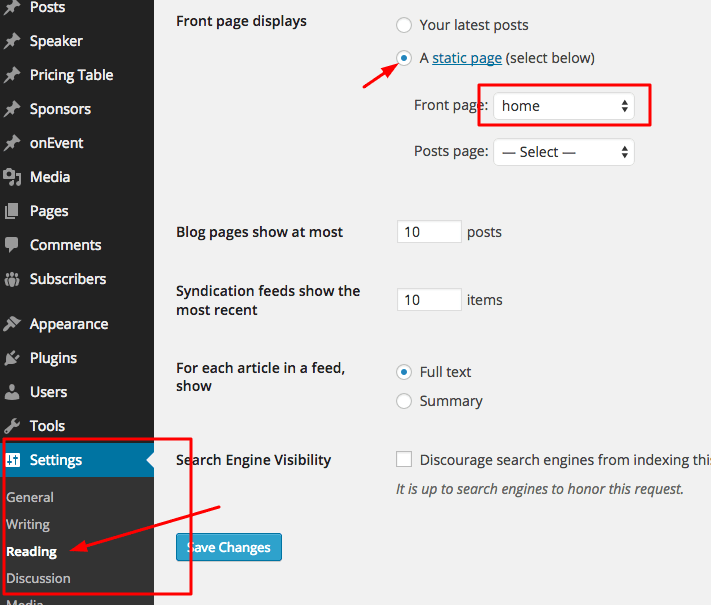
Go to Settings->reading: Front page displays. Select A static page (select below) and set front page Home
Then go to Appearance->Menus. Add your menu. and select Main Menu then save
Home page style and Details:
Home page style will found in pages->all pages-> home
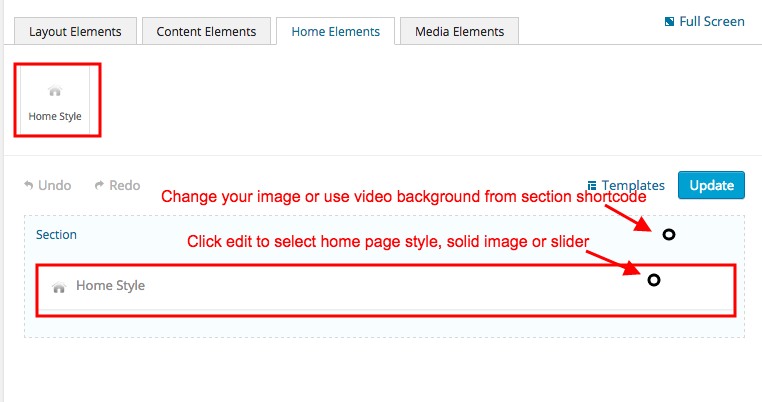
Here are hero slider
Theme Options
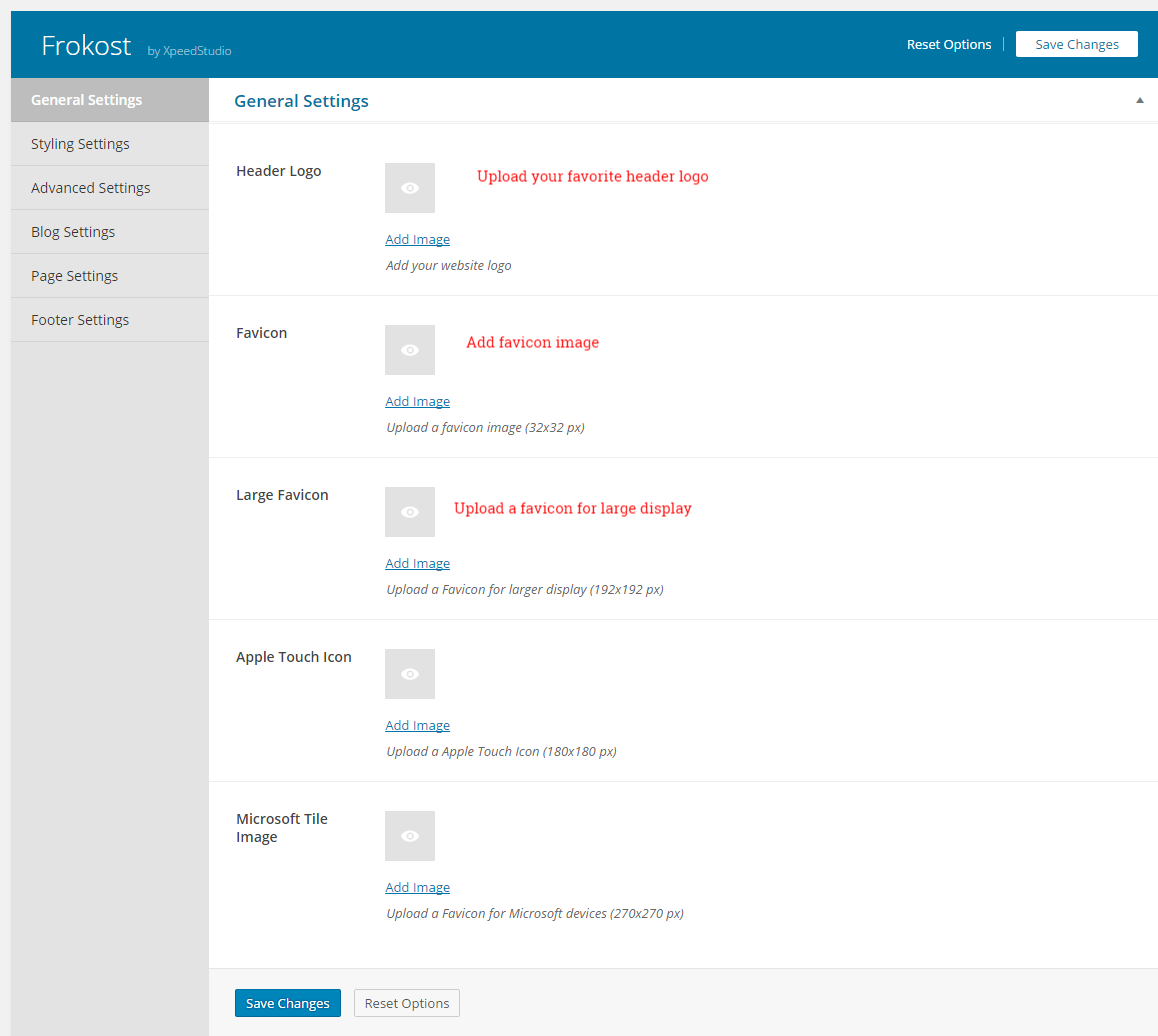
General
You can find the all Theme Option from Appearance-> Theme Settings->General
In General Settings you can do several important settings. like logo, favicon, pre loader image and Menu style
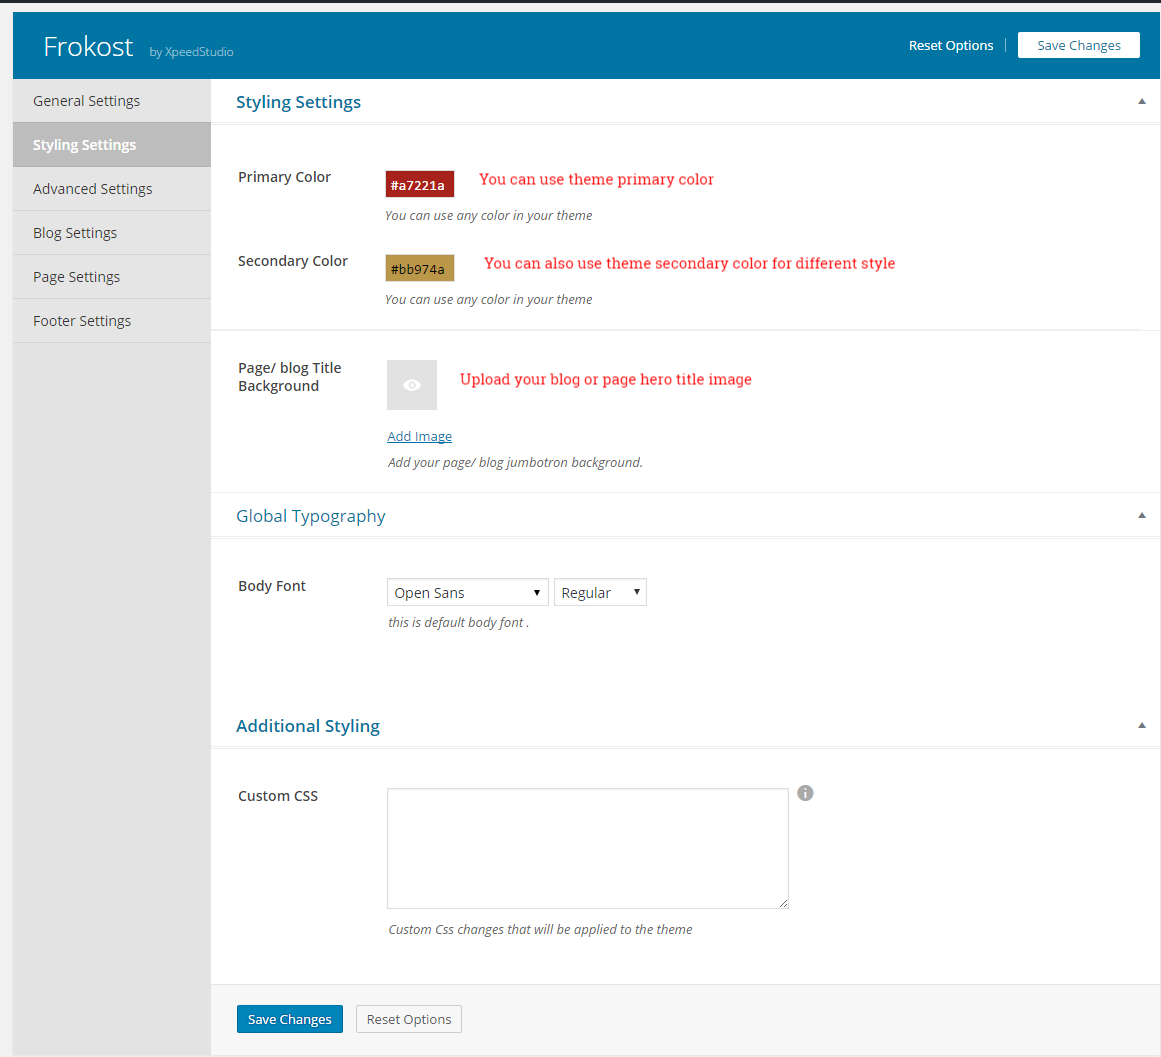
Styling Settings
Get All Styling Settings From Appearance-> Theme Settings-> Styling Settings
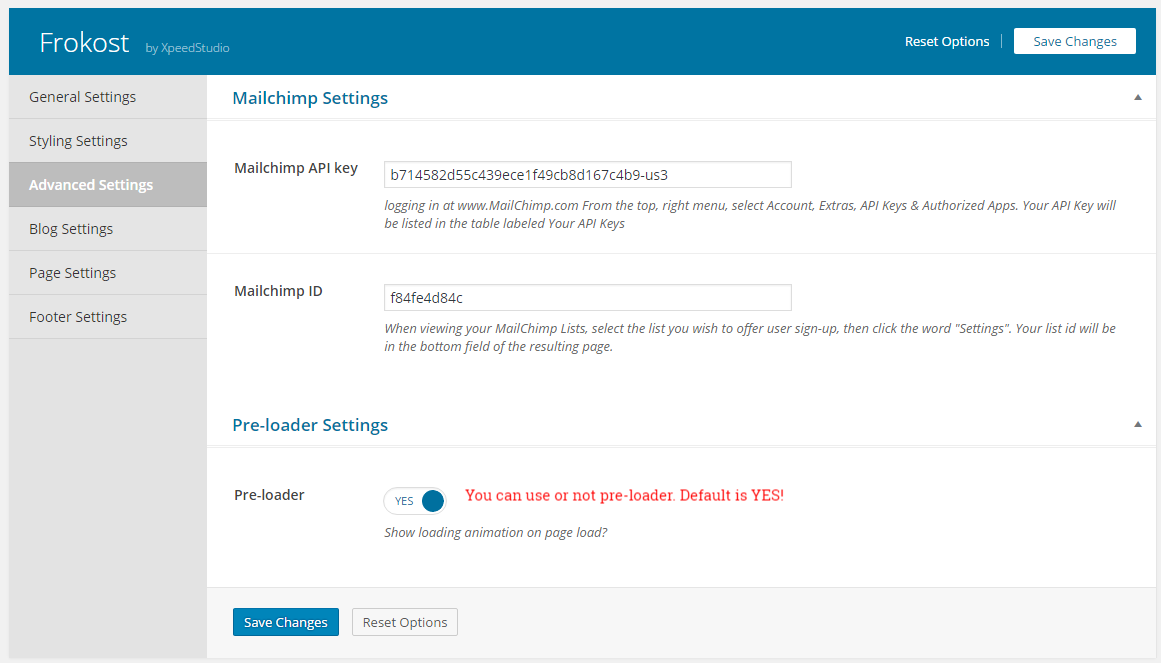
Advanced Settings
Get All Advanced Settings From Appearance-> Theme Settings-> Advanced Settings
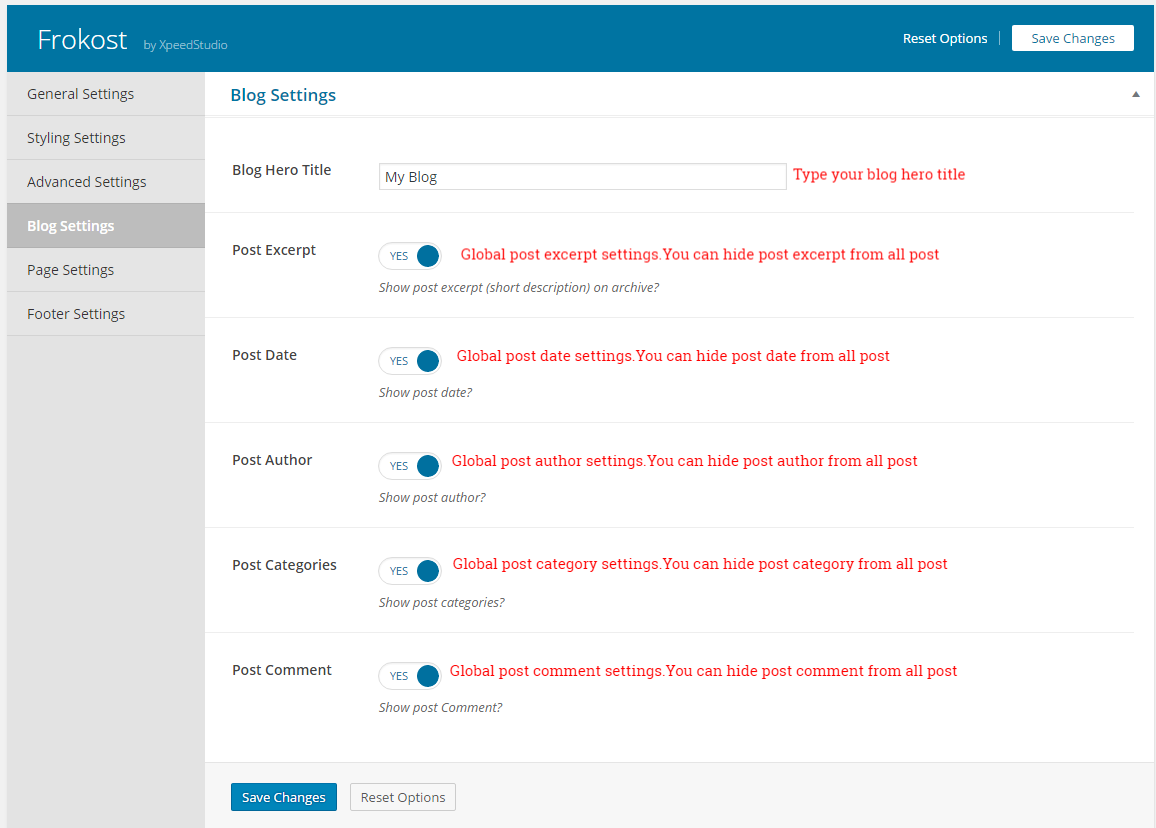
Blog Settings
Get All Blog settings From Appearance-> Theme Settings-> Blog Settings
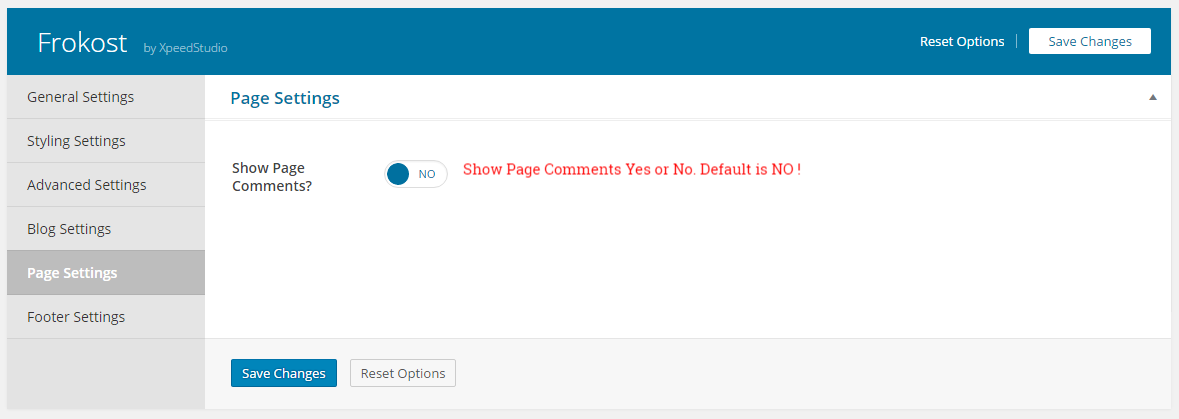
Page Settings
Get All Page settings From Appearance-> Theme Settings-> Page Settings
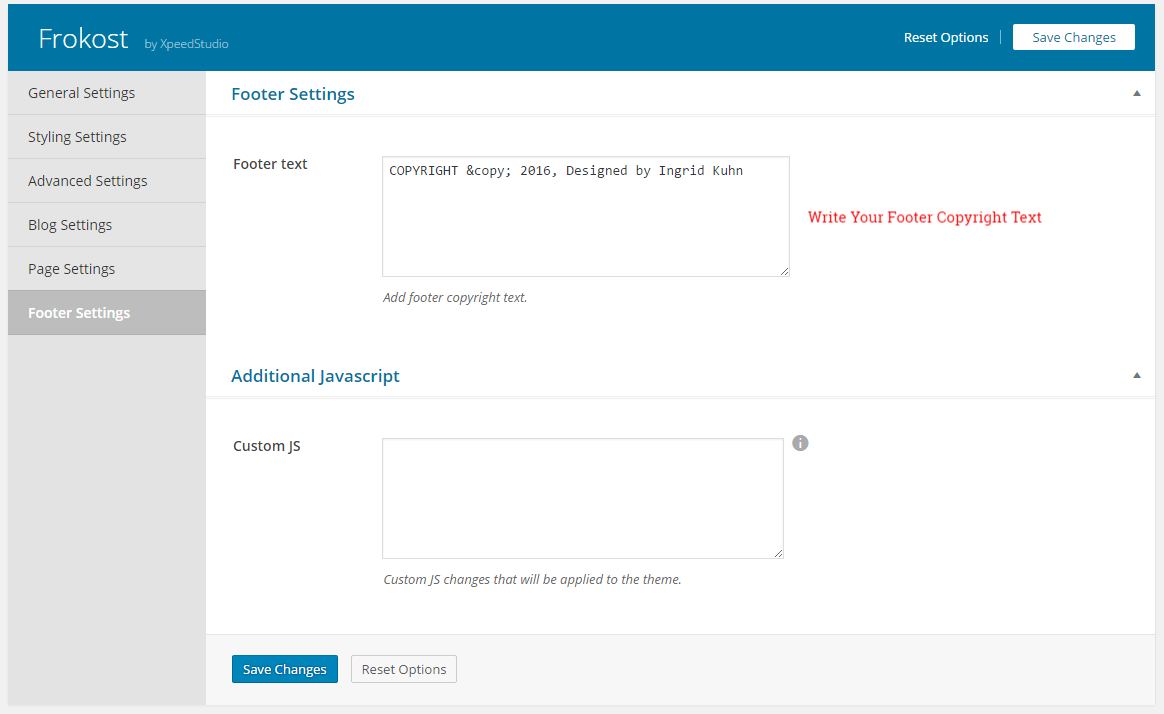
Footer Settings
Page Options
here is the List of Shortcode And page Option settings
Page Options
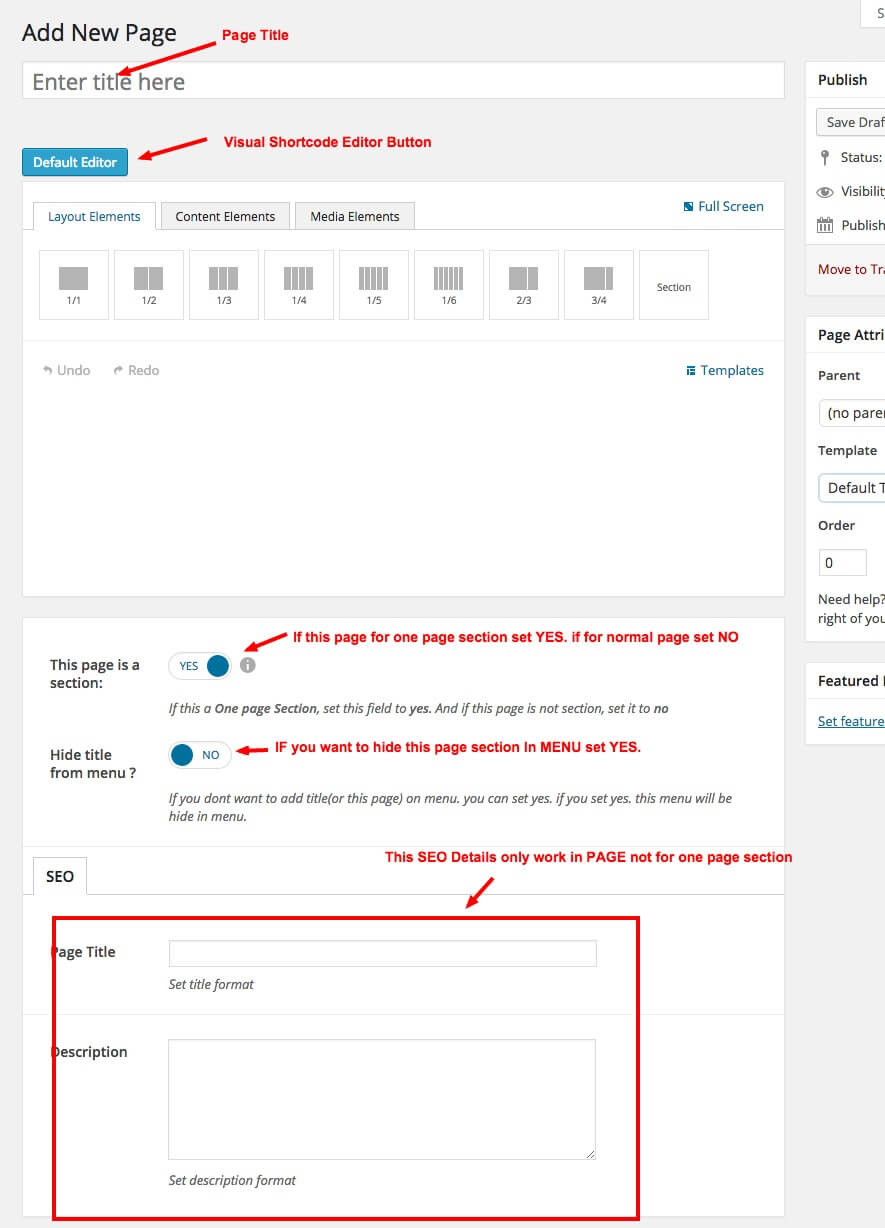
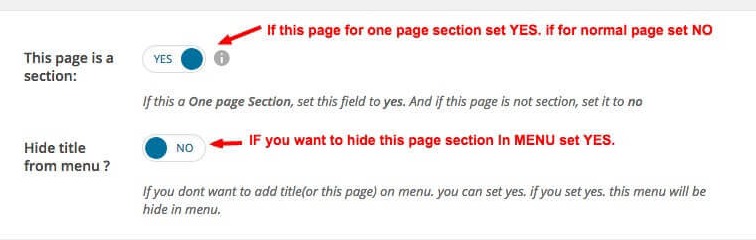
- This page is a section – If this page is a section Set YES. for Page Set NO
- Hide Title from menu: – If you like to hide page section from menu set YES
One page section
If you are using one page layout. One page section work with pages bottom page options. if you set This page is a section YES. This page will work under one page section
If you dont want to show title in menus. you can disable this from second page options. Hide Title from menu set NO. if you dont want to show in this title in menu
After add this page in appearance->menus to display in frontend under home page section
One Page section order
If you are using one page. All page section order work with menu order. go to Appearence -> Menus Up and down any menu according to your need And save.
Frontend Sections order working will be according to menu order.
Logo Order
As this theme built with center logo. we have added logo center with #logo ID within menu. Drag the logo according to your need to make this logo center.
But your logo need to be change from appearance-> theme settings-> Genarel Settings
Visual Page Builder
Building pages is very easy in this theme as you will use the Visual Page Builder and all the shortcodes that comes with it. In order to start visually building a a new page all you have to do is:
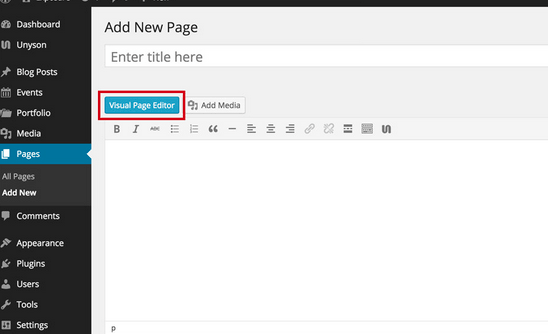
Go to Pages > Add New in order to add a new page.
Press the Visual Page Editor button in order to bring the visual page builder up.
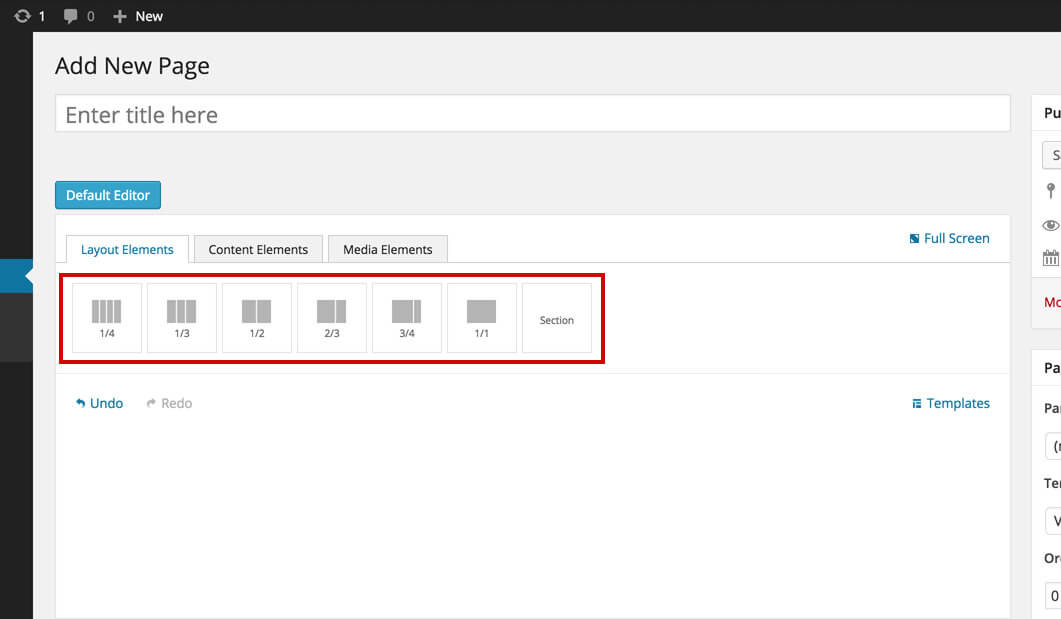
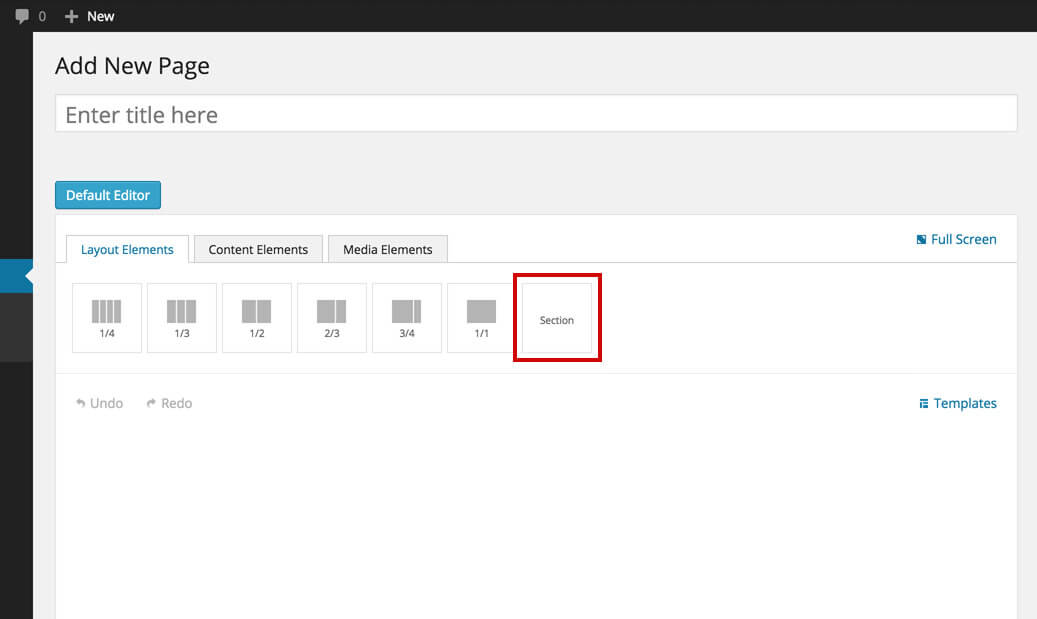
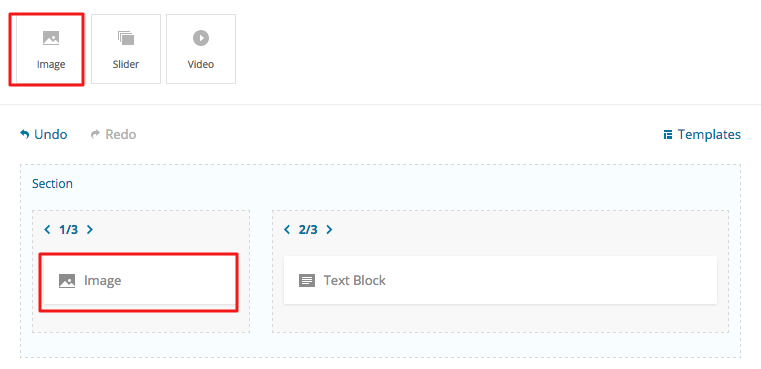
The builder is composed of elements that can be added on the page by dragging & dropping them (or by clicking on them). These elements are separated on 3 sections:
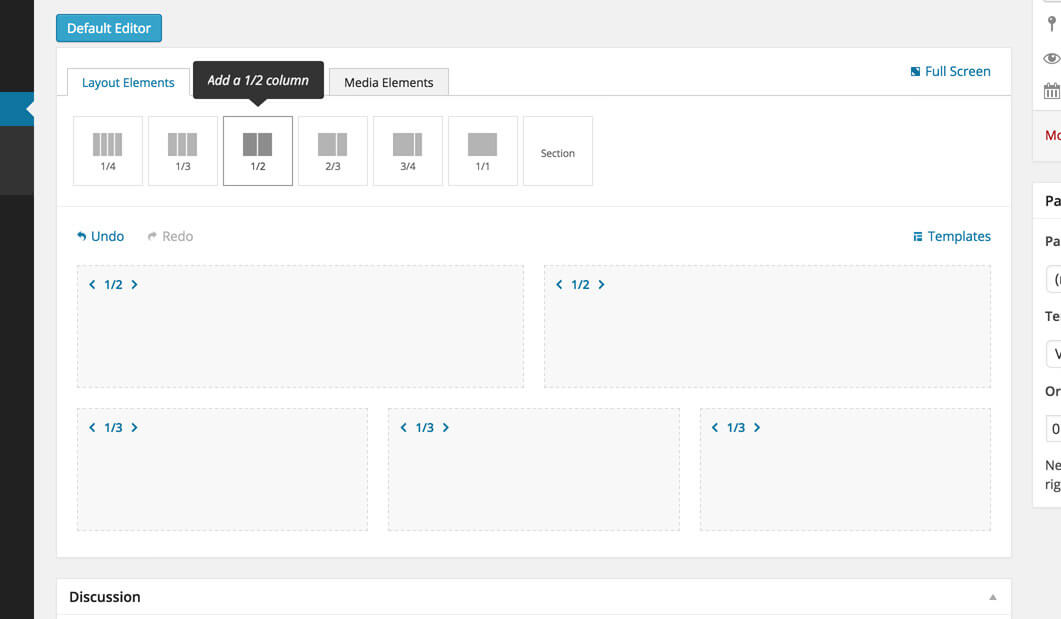
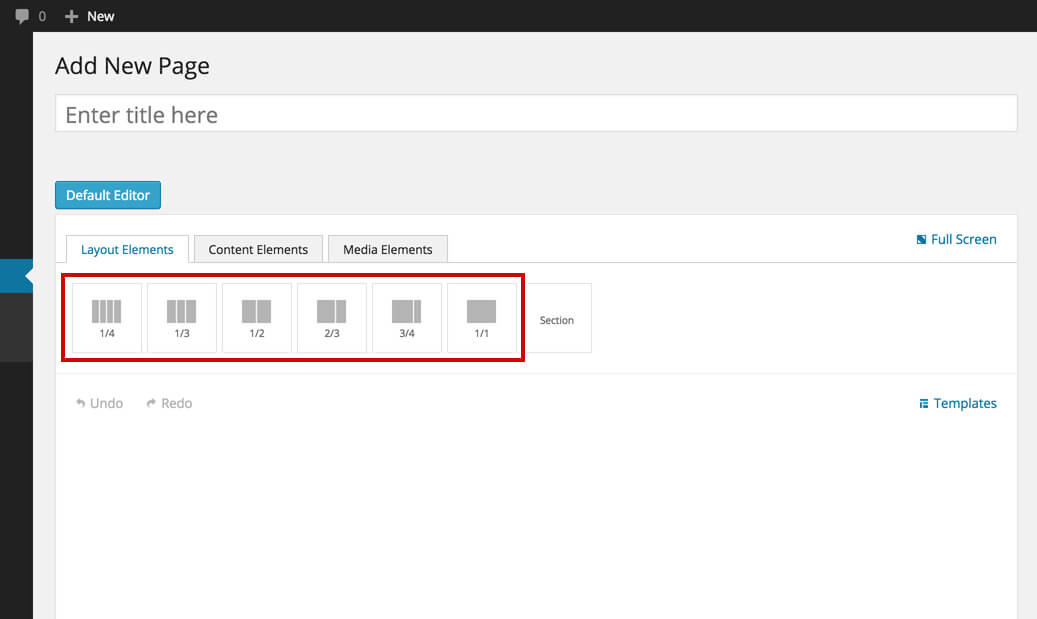
Layout Elements - composed mainly of different column elements and a custom full width section used to create the page structure
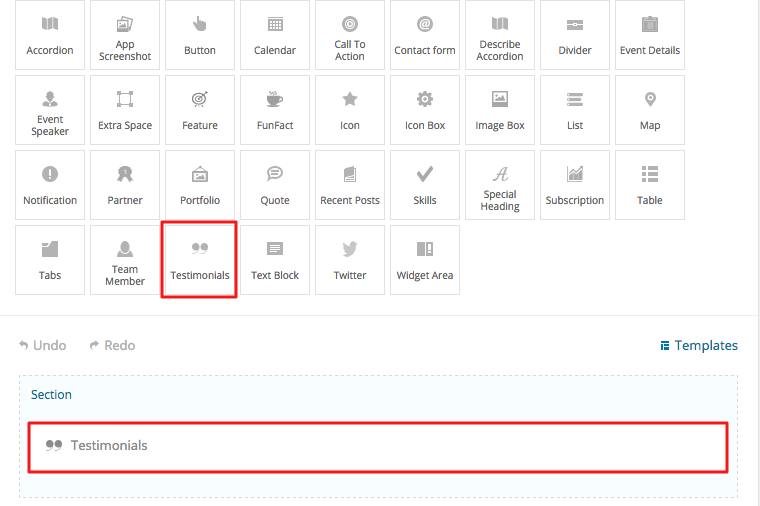
Content Elements - composed of shortcodes used to create the page content. You'll find all you need here, from buttons, quotes and tables to contact forms, testimonials and tabs.

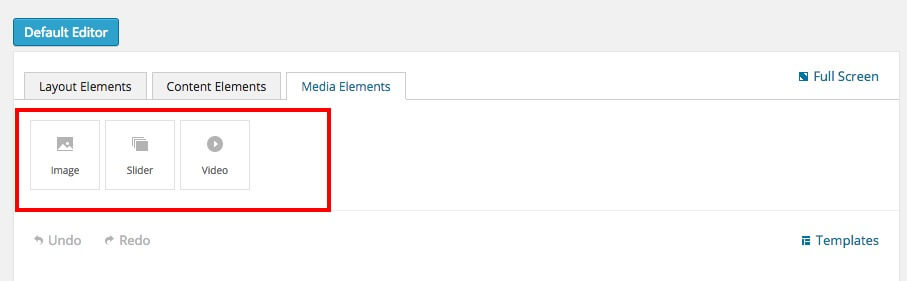
Media Elements - composed of shortcodes used to add media to your page: images, sliders, slideshows and video.
Every shortcode be it a column, section, content or media has different options built in. In order to bring the options up all you need to do is click the shortcode:
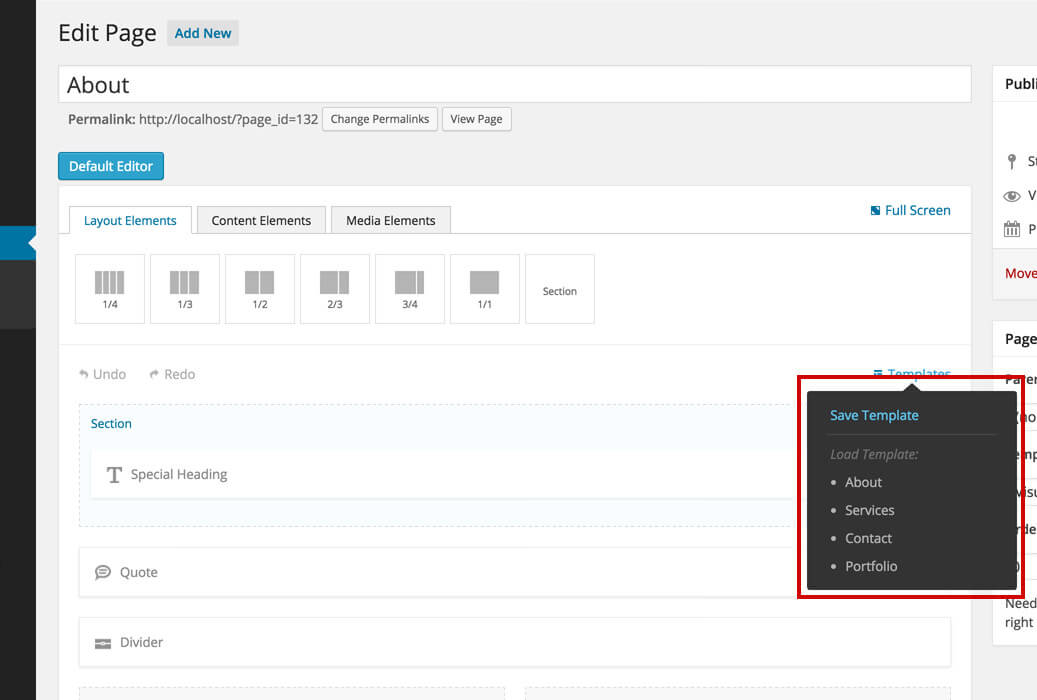
Another useful feature is called Templates. You can use it to save any templates you want for later use:
Section Shortcode
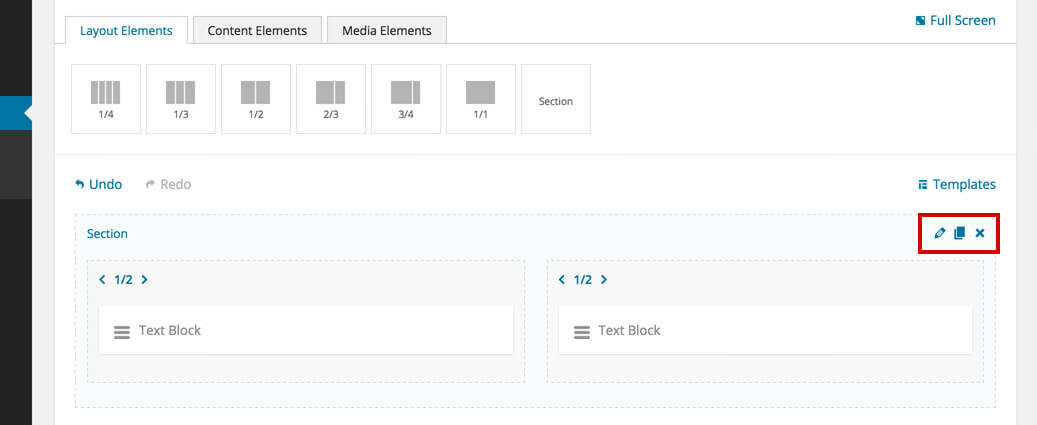
The Section Shortcode is as important as the columns as it comes with a lot of nifty options that will let you create some cool and unique pages:
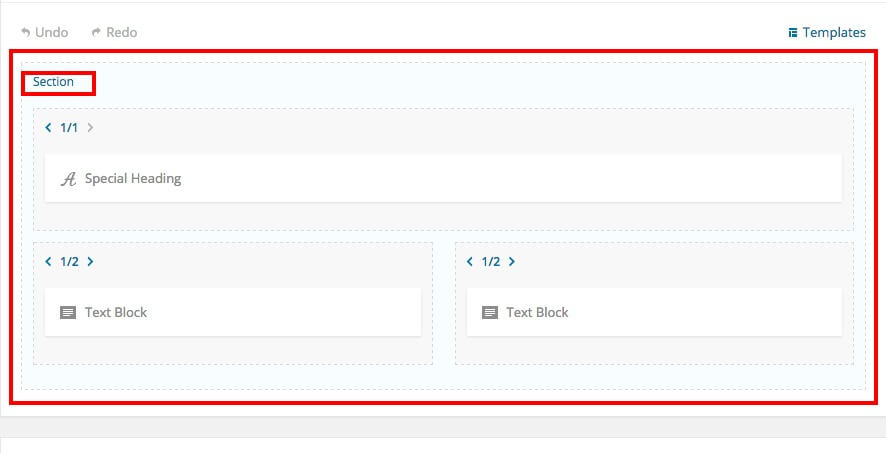
Note that the sections are always full width and you can drag columns inside them:
Sections can't be dragged into columns.
If you hover your mouse on any section these 3 icons will appear on the right hand side:
- Edit - brings up the option pop up for the section
- Duplicate - duplicates the section and its contents
- Delete - deletes the section
section options
Every section comes with a bunch of built in options. Click a section to bring up the options pop up:
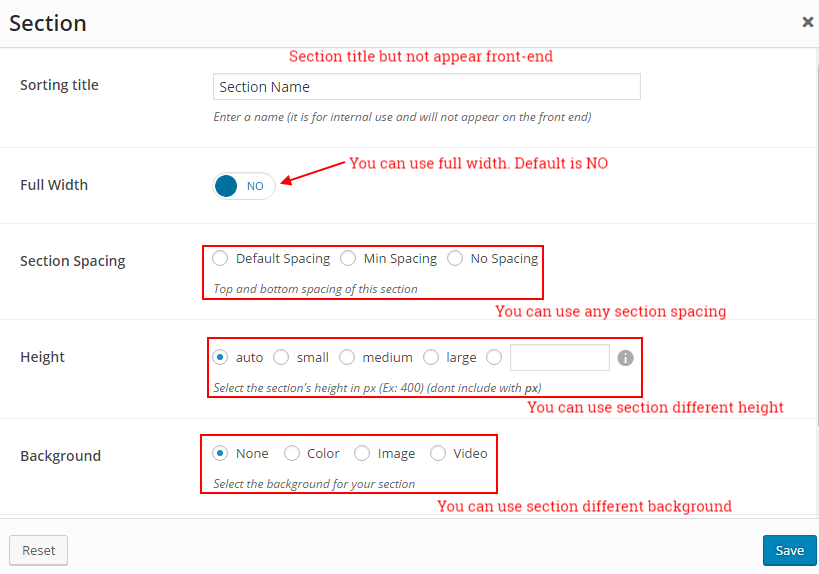
Full Width Content - this refers to the content inside the section. If you want to make the content inside this section full width select YES. It comes NO by default. Even if the section it self is full browser width the content can be as wide as the normal content area or full browser width as the section:
Default Spacing - this option lets you choose if you want to use the default top and bottom spacings built into the theme.
If you set NO: top and bottom default space will be removed
Height - this option lets you control the height of your section. It's Auto by default and it also has 3 preset choices (small, medium and large). These presets were created in order to help you keep all your sections heights consistent across your website.
Background - a couple of options related to your section's background: None, Image, Video and Color.
- None: This will be default option
- Color: you can use any background color
- Image: Add image background: also you can use image overlay color
- Video: add youtube video to display in your background
Custom Class - you can use this options to add a class and further style the shortcode by adding your custom CSS in the style.css file. This file is located on your server in the /frokost-child/styles.css.
Columns Shortcode
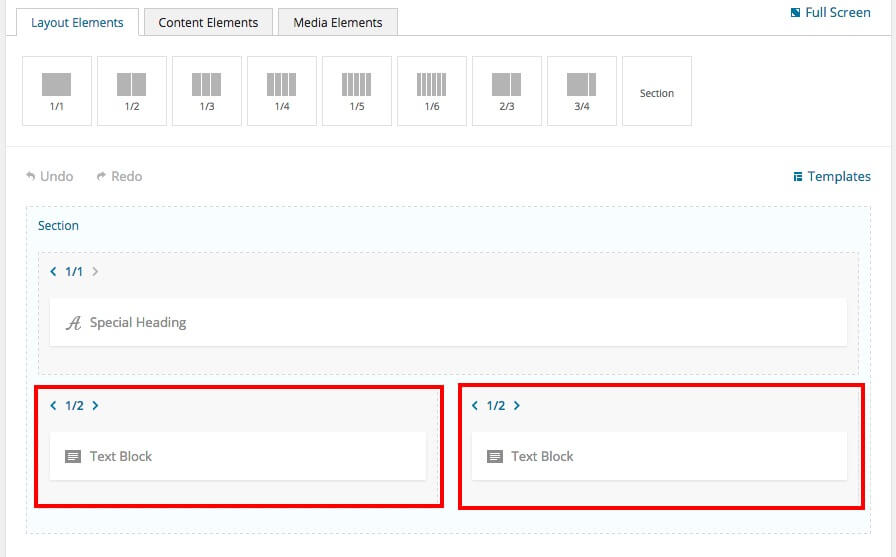
The Columns Shortcodes are part of the back bone page structure and they come in different predefined sizes for you to use:
After you've added a column on the page, you can modify its size from the arrows on the left hand side:
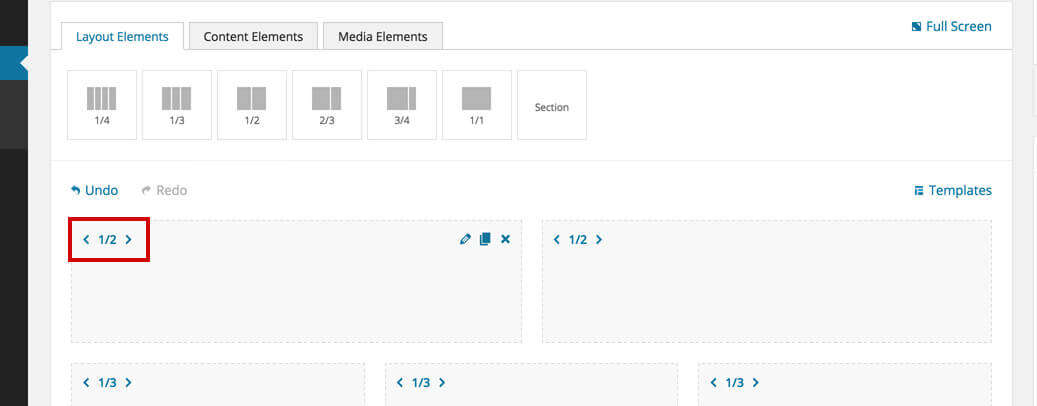
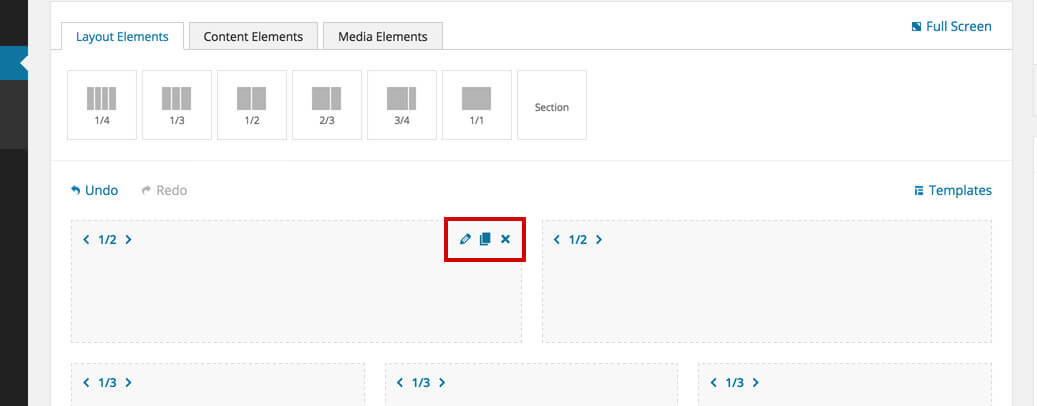
When you hover your mouse on any column these 3 icons will appear on the right hand side:
- Edit - brings up the option pop up for the column
- Duplicate - duplicates the column and contents
- Delete - deletes the column
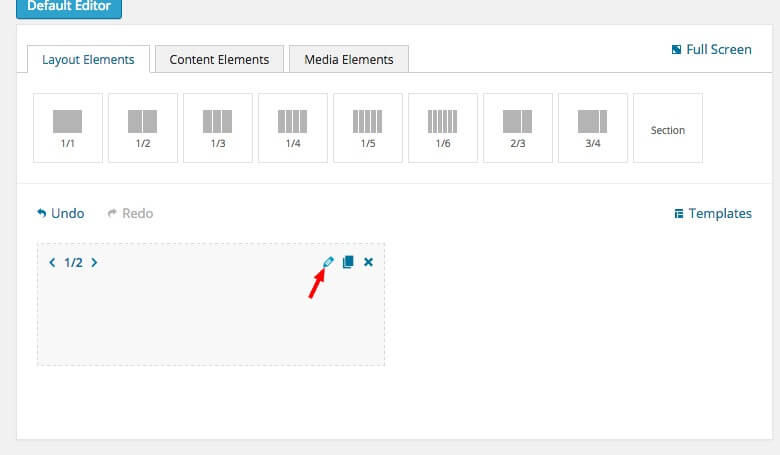
Column options
Every column comes with a bunch of built in options. Click a column to bring up the options pop up:
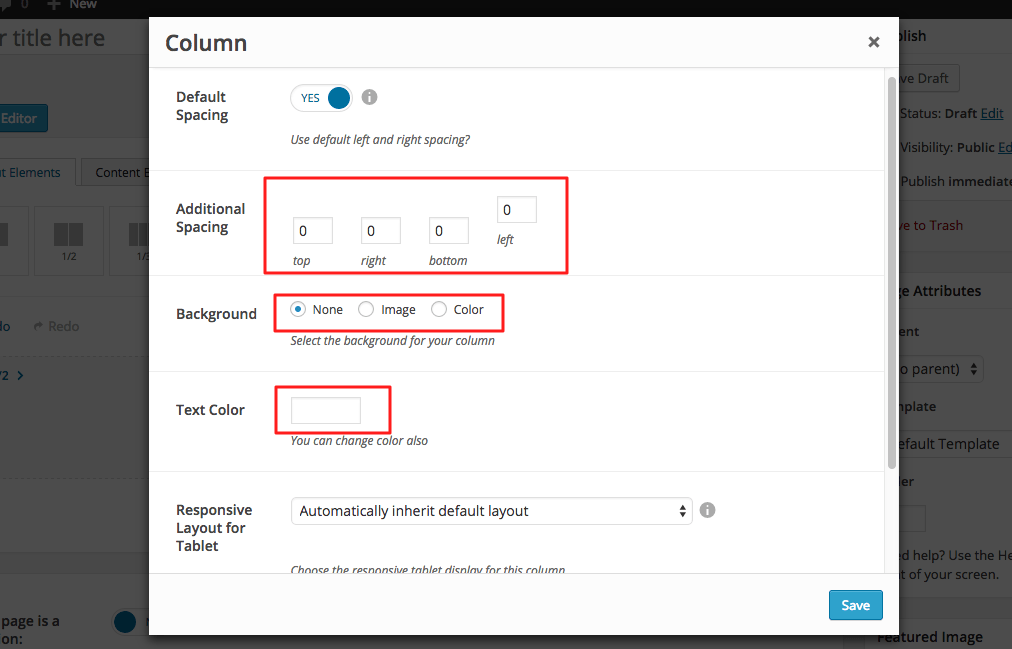
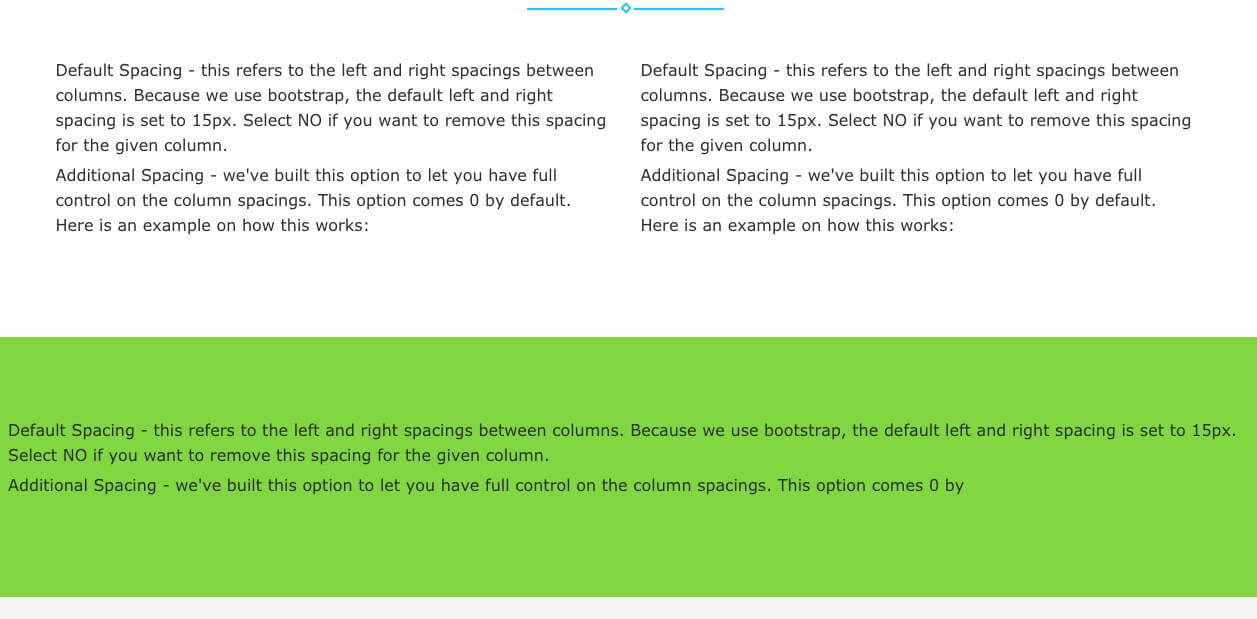
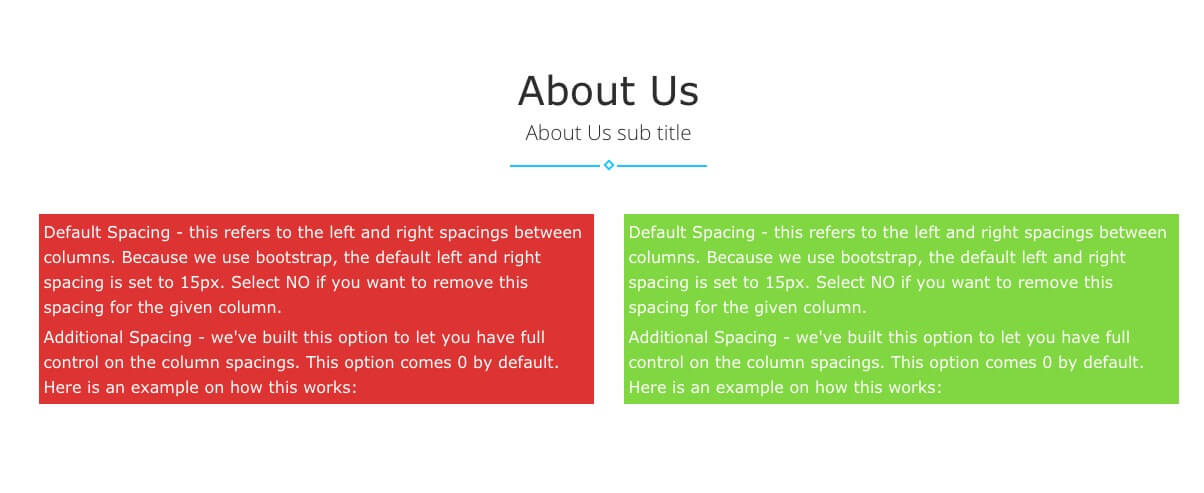
Default Spacing - this refers to the left and right spacings between columns. Because we use bootstrap, the default left and right spacing is set to 15px. Select NO if you want to remove this spacing for the given column.
Additional Spacing - we've built this option to let you have full control on the column spacings. This option comes 0 by default. Here is an example on how this works:
- Background - a couple of options related to your section's background: None, Image, and Color.
- None: This will be default option
- Image: Add image background: also you can use image overlay color
- Color: you can use any background color
- Color change column text color
- Responsive Layout for Tablet- Use this option in order to control how this column behaves on tablets (and devices with the resoution between 768px - 990px). Note that on phones all the columns are 1/1 by default.
- Layout Offset - These classes increase the left margin of a column by * columns. For example, .fw-col-md-offset-4 moves .fw-col-md-4 over four columns. for more details check in GetBootstrap
Text-Align - You can use this option to align your colum text like left, center and right alignment
Custom Class - you can use this options to add a class and further style the shortcode by adding your custom CSS in the style.css file. This file is located on your server in the /getleads-child/style.css
We have this structure
that looks like this in the front end
If we add an Additional Spacing of 50 (px) to the green column, then the front end will change to this:
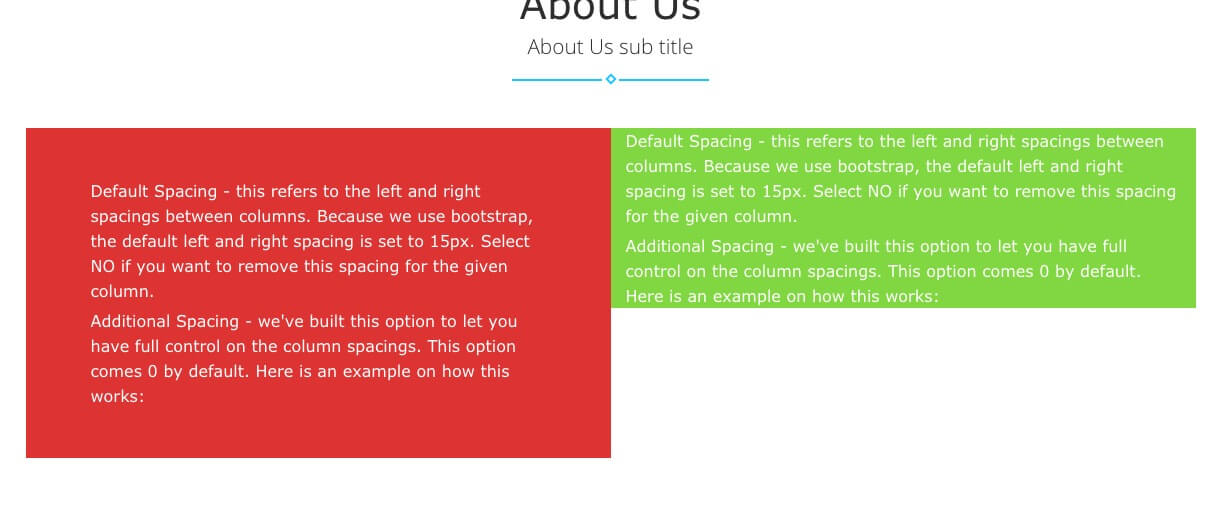
The additional spacing option is just that, additional spacing to the default one. So in our example above, we'll end up with 65px on right and left, that is because we have the default spacings on (15px on each side).
Background - this option will let you control the column background. You can add an image, set an image overlay color or a solid background color
Responsive Layout for Tablet - will let you control how this column behaves on tablets (and devices with the resolution between 768px - 990px). Note that on phones all the columns are 1/1 by default.
Custom Class - you can use this options to add a class and further style the shortcode by adding your custom CSS in the style.css file. This file is located on your server in the /getleads-child/style.css
Shortcodes
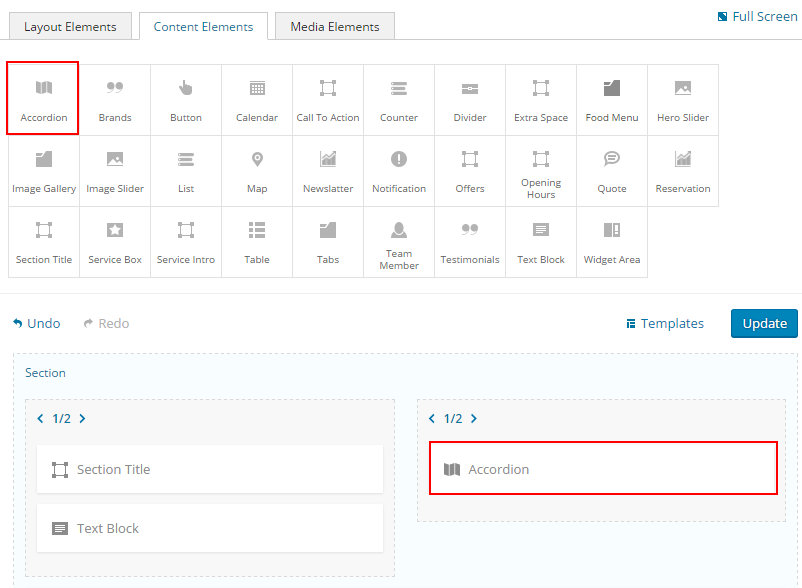
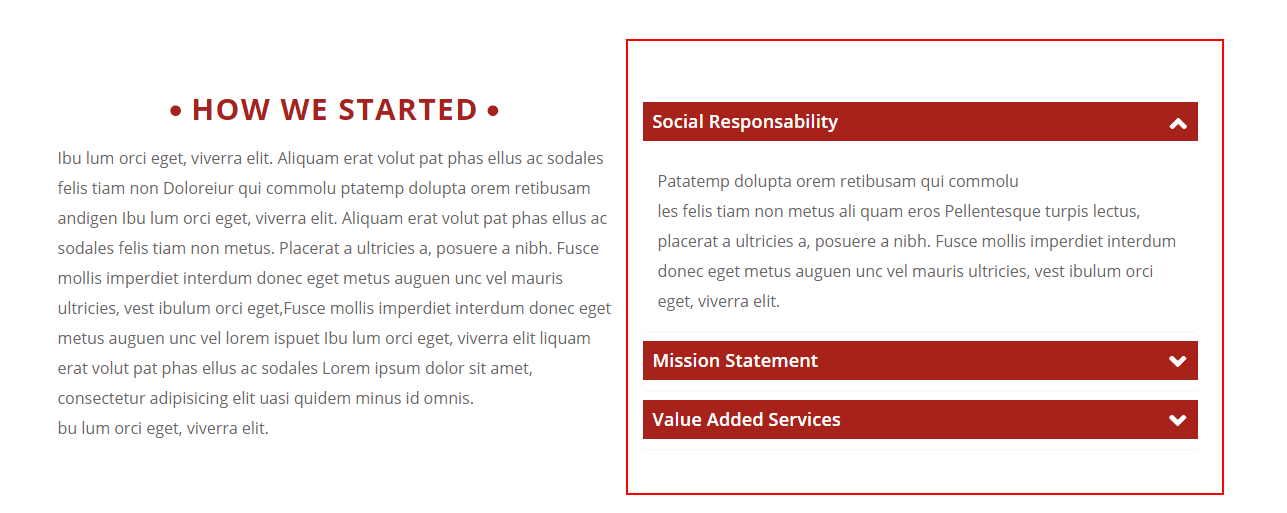
Accordian
This shortcode will let you create an accordion. In order to add one to your page, just drag & drop, or click) it.
Back-end
The accordion options:
Click on the shortcode to bring up the options:
Tabs - lets you add content to your accordion. Click the Add button in order to add a tab to your accordion. You can input the title, the content, choose if your your tab's default state (opened or closed) or add an icon.
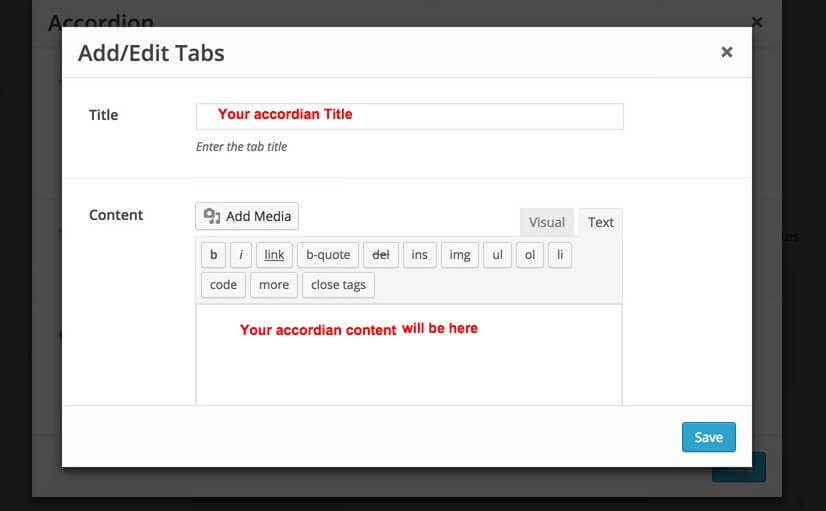
Custom Class - you can use this option to add a class and further style the shortcode by adding your custom CSS in the style.css file. This file is located on your server in the /frokost-child/style.css
Front-end
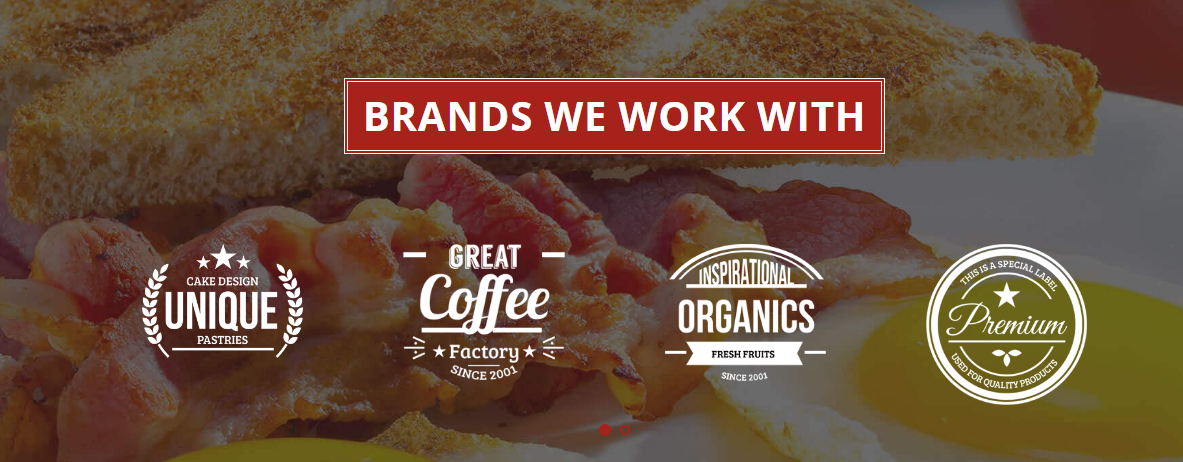
Brands
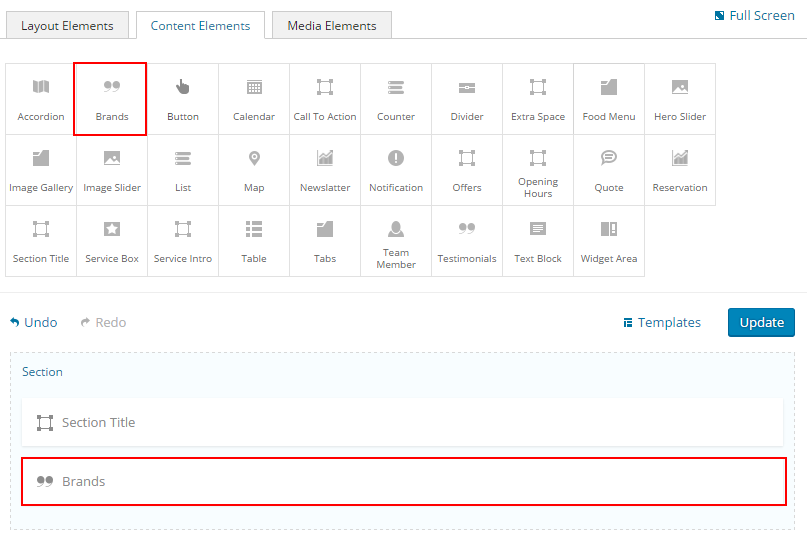
Brands option
- Brands
- Image Upload your brands image
- Brand Link Insert brands image link
Front End:
Button
This shortcode lets you add a button to your page by dragging & dropping, or clicking on it:
Back-end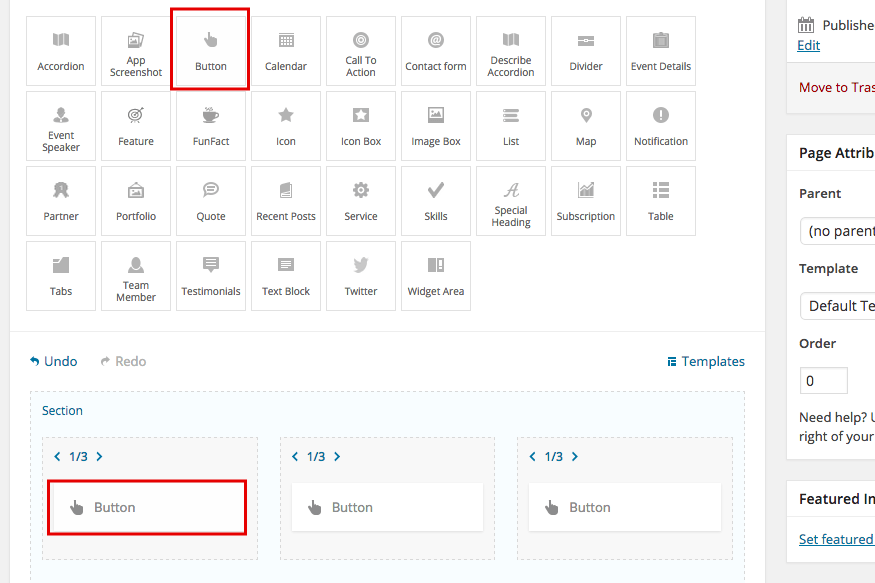
The button options
Click on the shortcode to bring up the options:
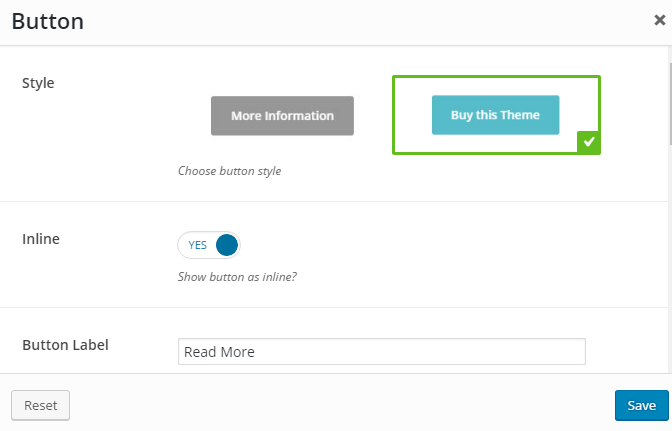
- Button
- Style - lets you select the button style. We've built in two buttons style like button or image button.
- Inline - Button inline Yes or No. that appears inline your button.
- Label - this is the text that appears on your button.
- Link - a URL link that your button will link to.
- Link in New Window - if you want your link to open in a new window.
- Size - choose from the three built in sizes. Large, medium and small.
- Icon - use this option if you want to add an icon to your button.
- Alignment - the button alignment in the container. left, center and right
Custom Class - you can use this options to add a class and further style the shortcode by adding your custom CSS in the style.css file. This file is located on your server in the /frokost-child/style.css
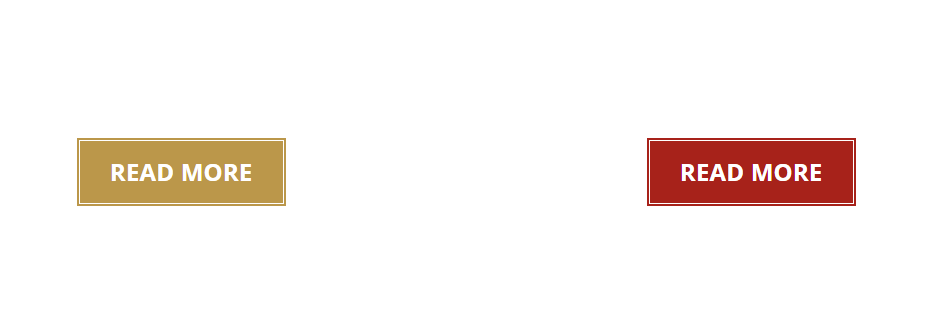
Front-end
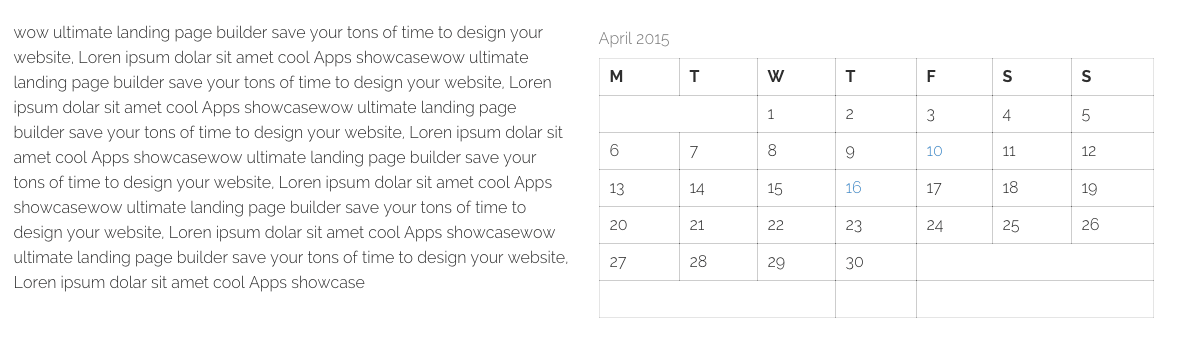
Calender
This shortcode lets you add a calendar to your page by dragging & dropping, or clicking on it:
Back-end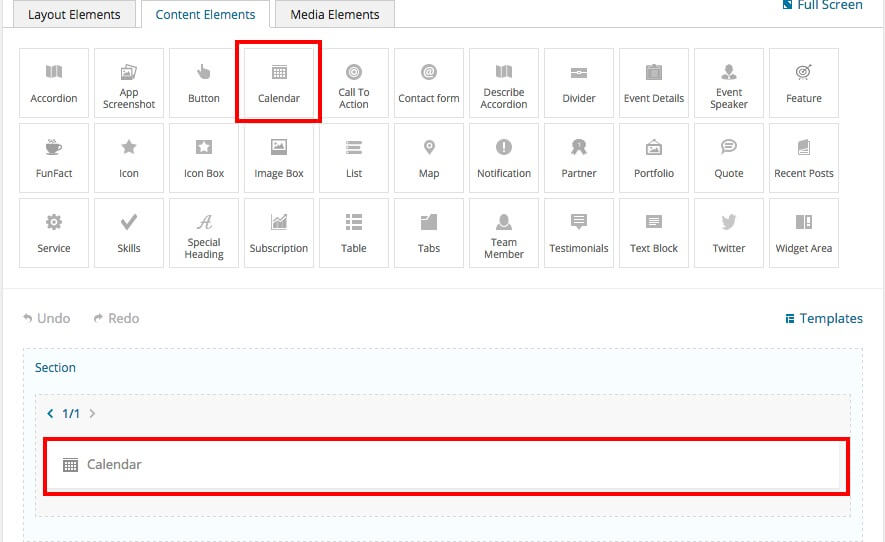
The calendar options
Click on the shortcode to bring up the options:
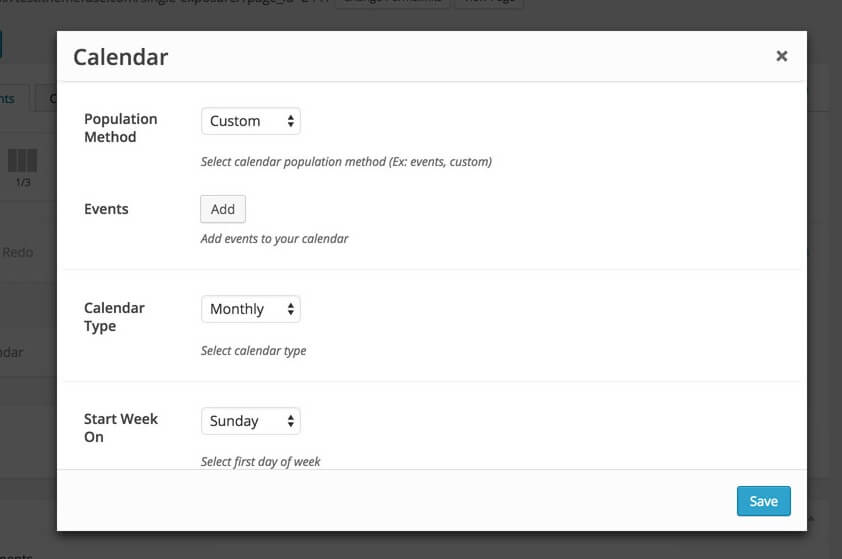
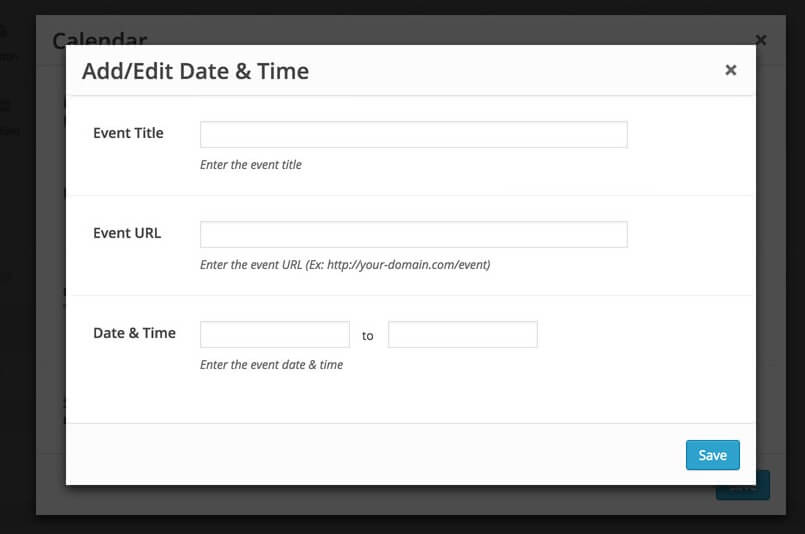
- Population Method - select how your calendar will be populated with events. Custom lets you add events right here in the shortcode and Events lets you select an event category to be displayed in the calendar.
- Events - lets you add events right here in the shortcode and comes with its set of options in a new pop up.
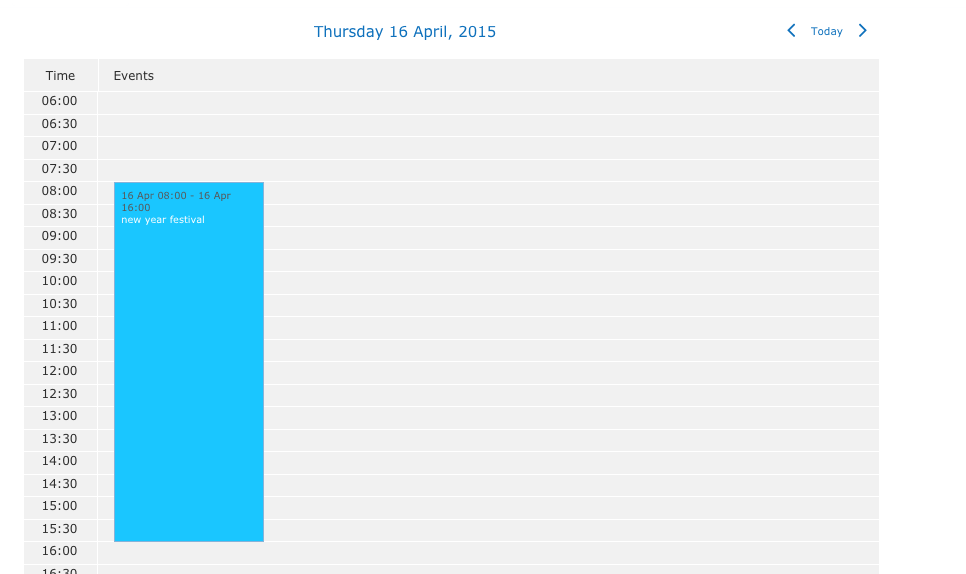
- Calendar Type - lets you select the type of calendar you want on the front end. You can choose between Daily, Weekly and Monthly and they look like this:
Daily
Weekly
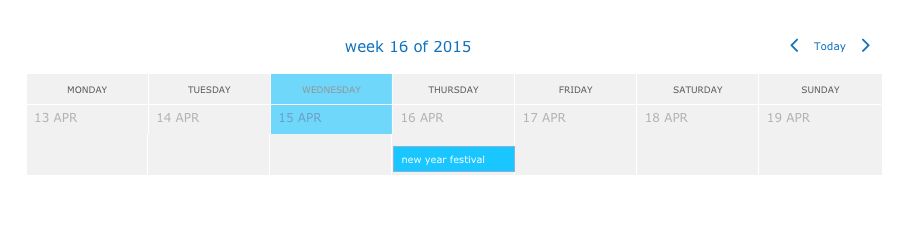
Monthly
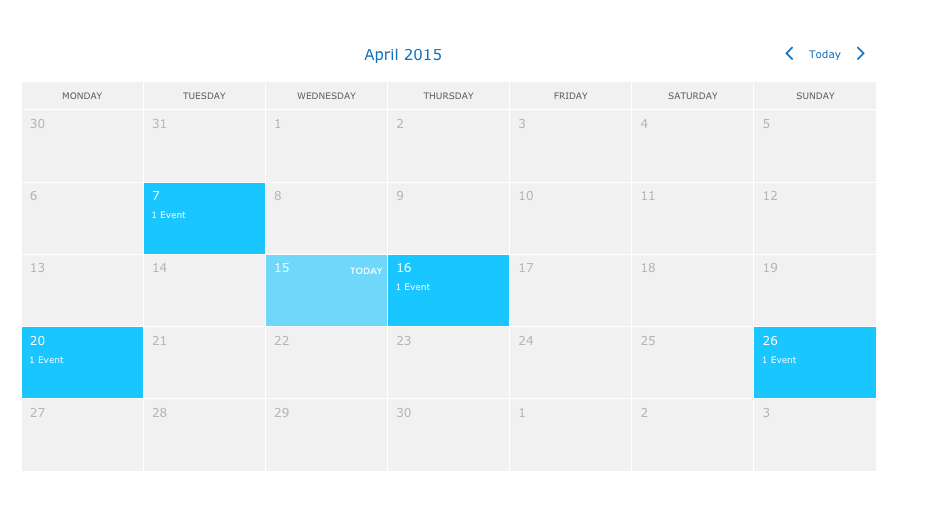
The Weekly and Monthly calendar types work well in full width (1/1 columns)..
- Start Week On - select the first day of the week: Monday or Sunday.
Call to Action
This shortcode lets you add a call to action to your page:
Back-end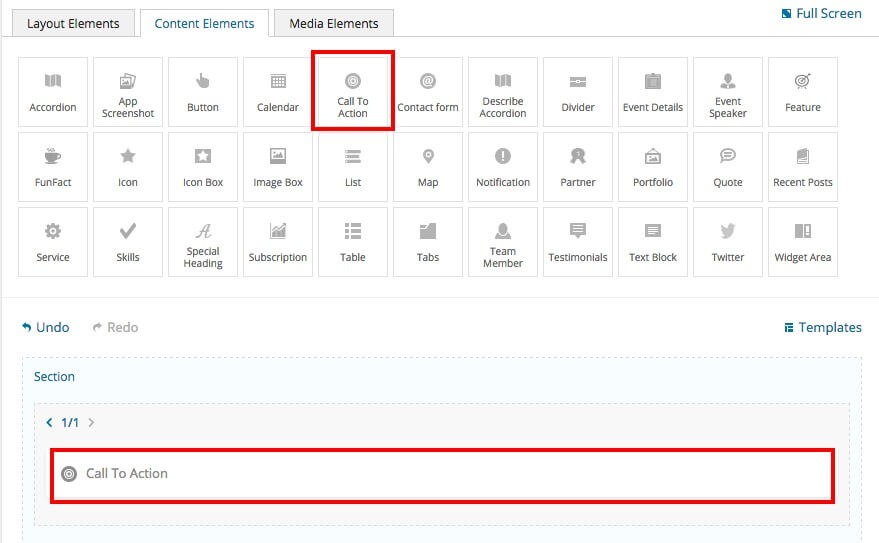
The call to action options
Click on the shortcode to bring up the options:

- Heading - Type your call-to-action heading title
- Featured Image - Upload your call-to-action image
- Content - Enter your content text.
- Images - Add your call to action images.
The call the action shortcode works well in larger size columns
Front End:

Counter
Counter for show some Counter your experince or work related
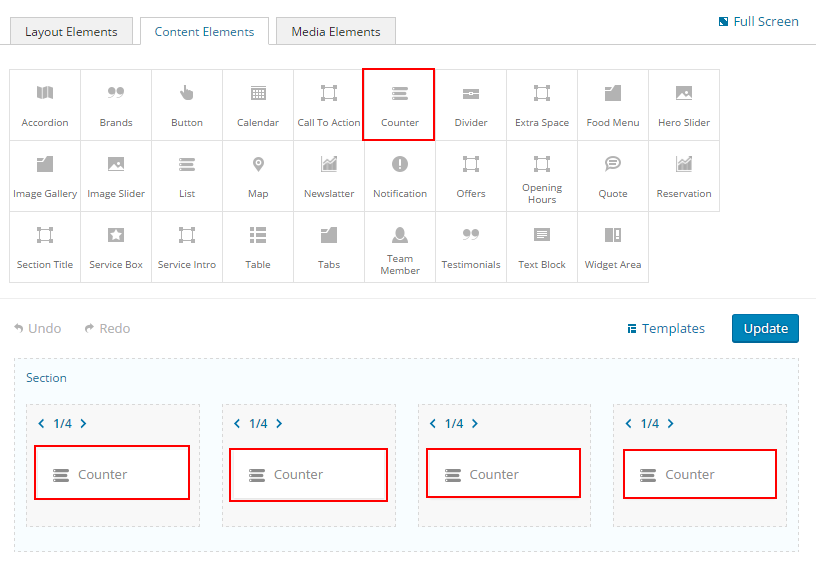
Counter options
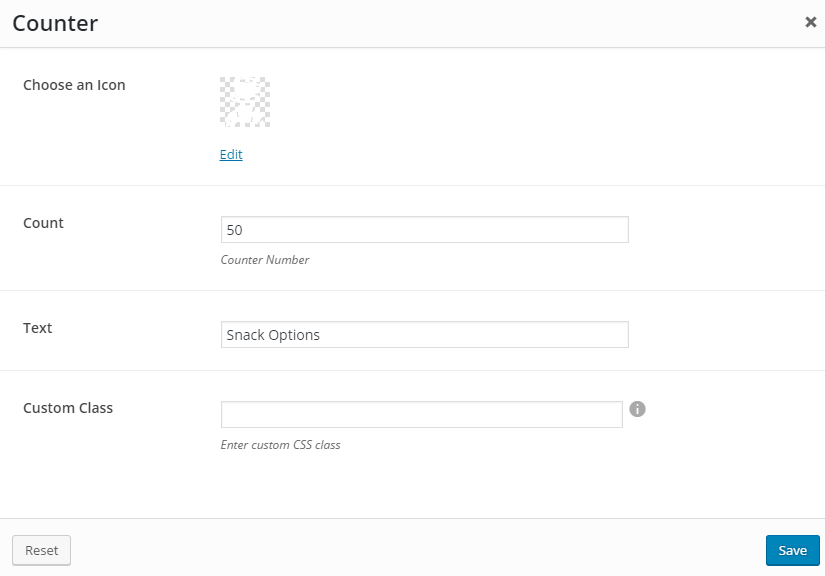
- Choose an Icon: Add icon
- Count Add counter number
- TextAdd counter title, like Snack Options
Custom Class - you can use this options to add a class and further style the shortcode by adding your custom CSS in the style.css file. This file is located on your server in the /frokost-child/style.css
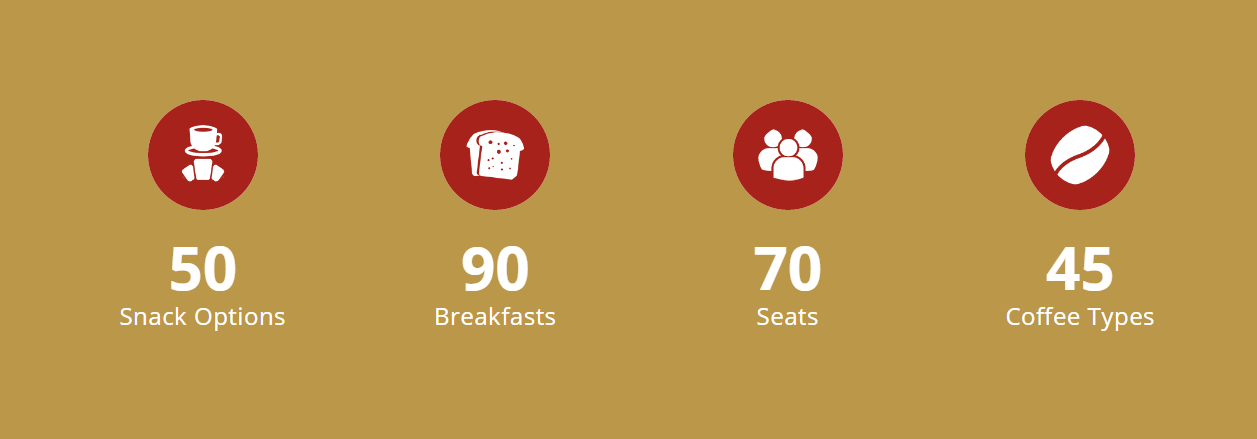
You can add image or color background from section shortcode
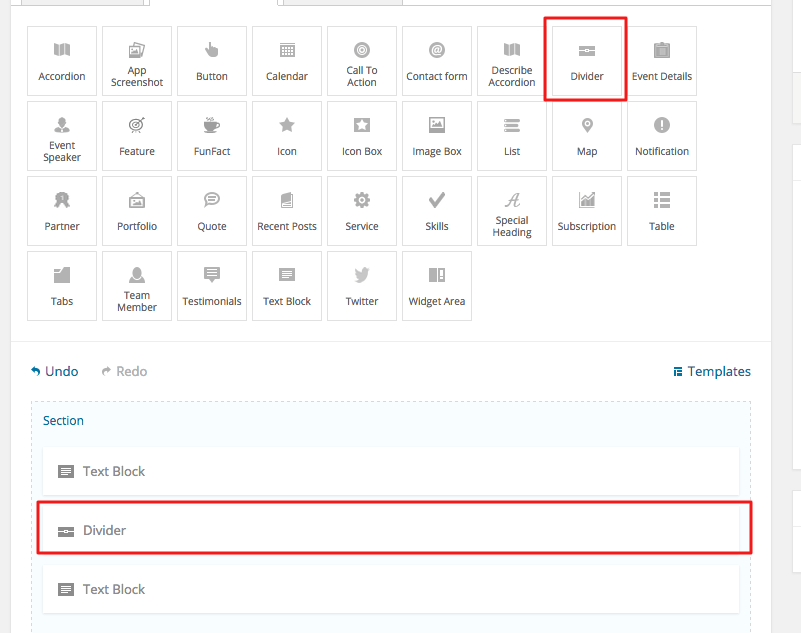
Divider
This shortcode lets you add a divider to your page:
Back End
The divider options
Click on the shortcode to bring up the options:
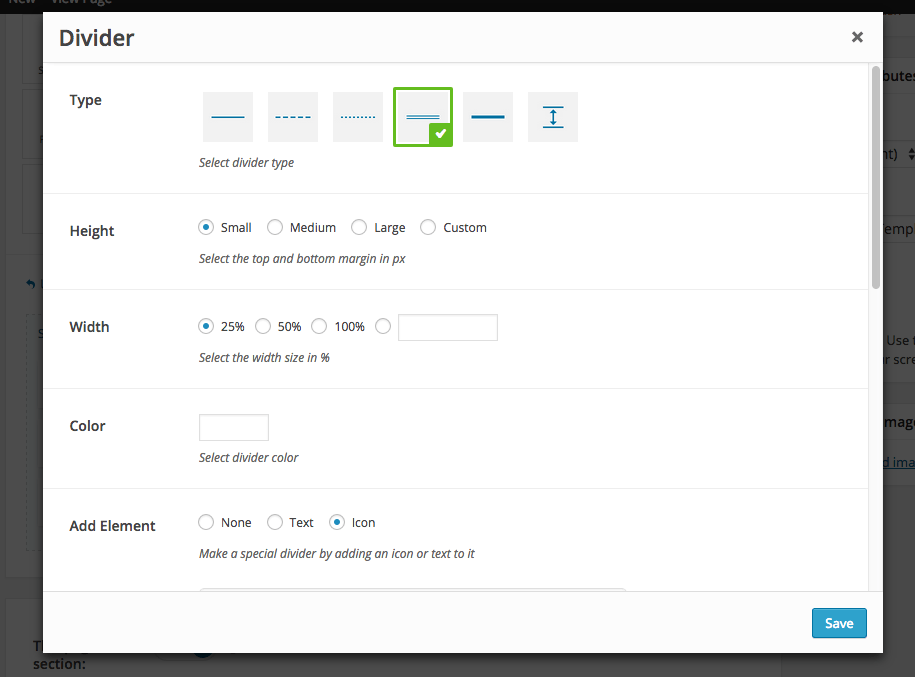
- Type - lets you choose the type of the divider: single line, dashed, double line and more.
- Height - lets you choose one of the predefined heights or input a custom one.
- Width - the width of the divider in percentage.

- Color - the divider color.
- Add Element - you can use this option to add a text or an icon to your divider. The front end result might look like this
Link ID - you can enter a cutom css ID for this divider. Use this ID in any URL link in the page in order to anchor link to this divider (e.g http://link/#custom_id)
Custom Class - you can use this options to add a class and further style the shortcode by adding your custom CSS in the style.css file. This file is located on your server in the /frokost-child/style.css
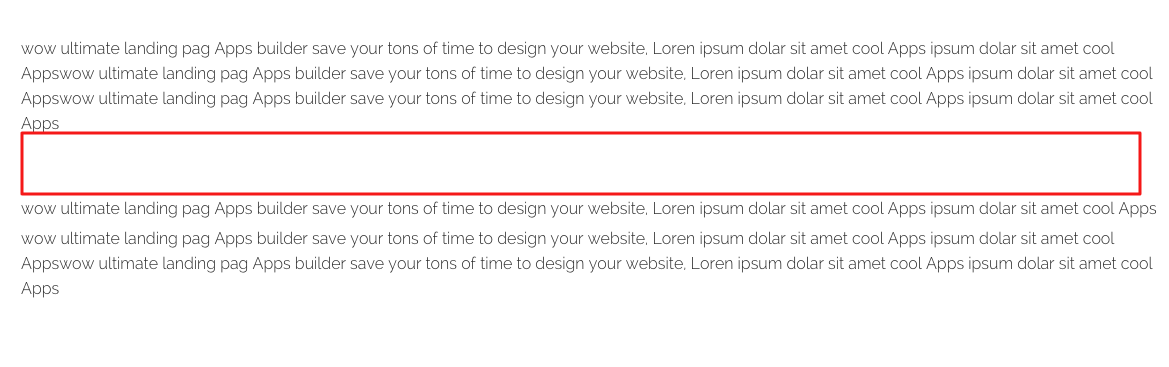
Extra Space
This shortcode lets you add a Extra space into your page:
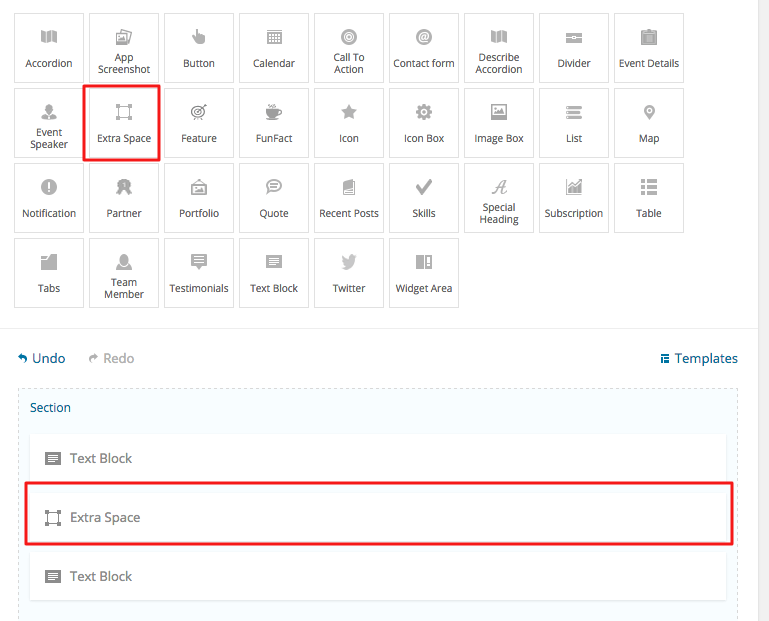
Space options
Click on the shortcode to bring up the options:
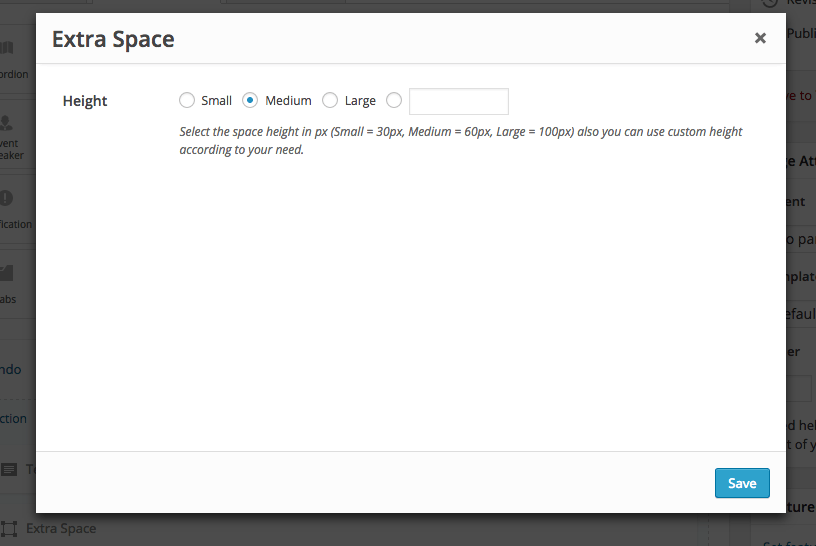
- Height - lets you select one of the 3 built in height or input a custom one (in pixels).(Small = 30px, Medium = 60px, Large = 100px) also you can use custom height according to your need.
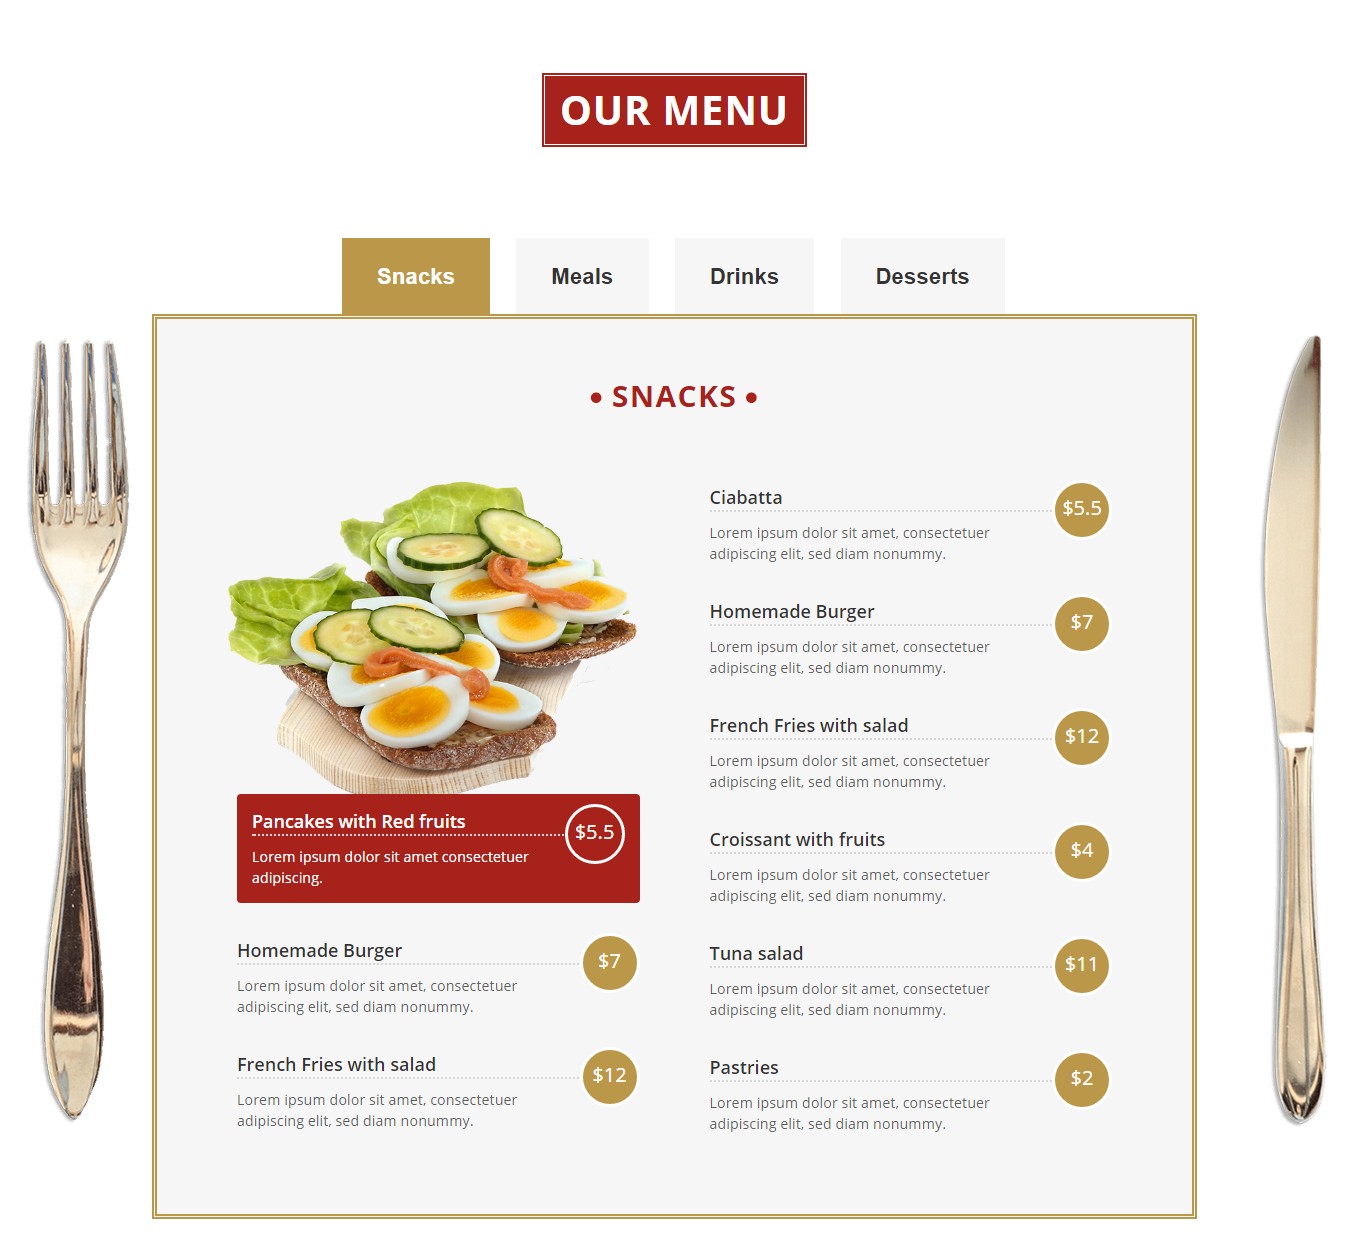
Food Menu
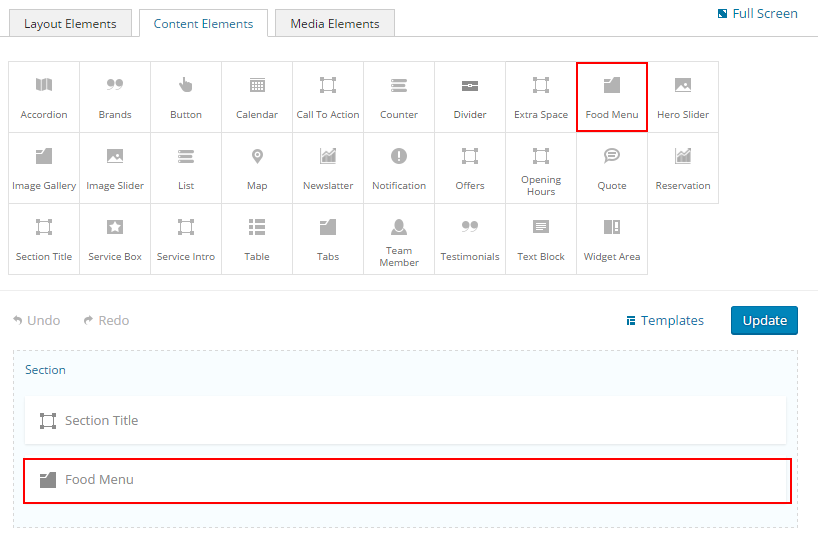
Food Menu option

- Food Menu Add Food Menu
Front End:
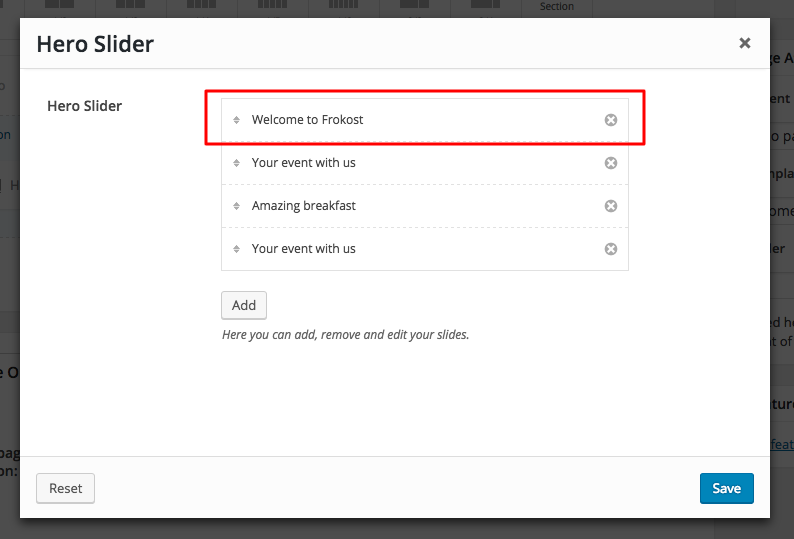
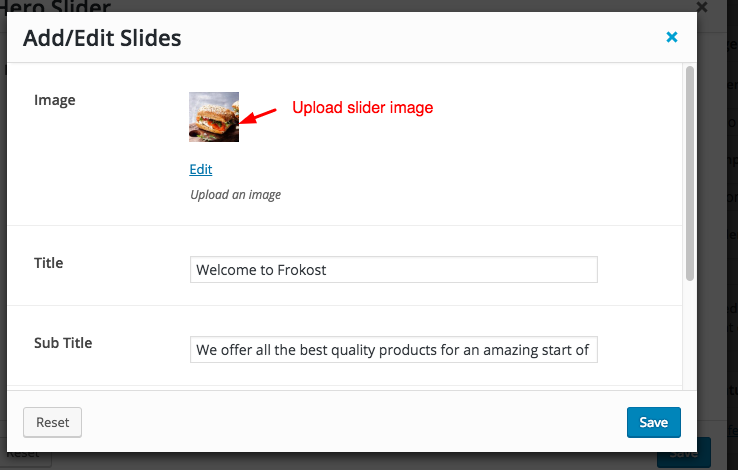
Hero Slider
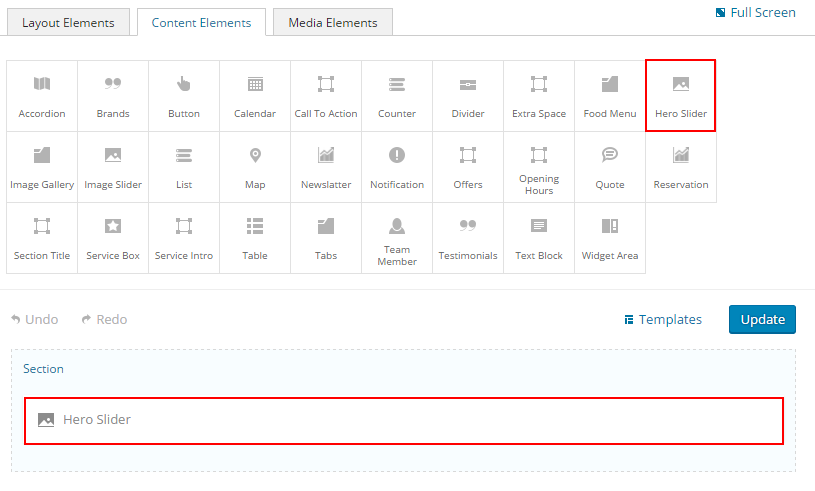
Hero Slider Options
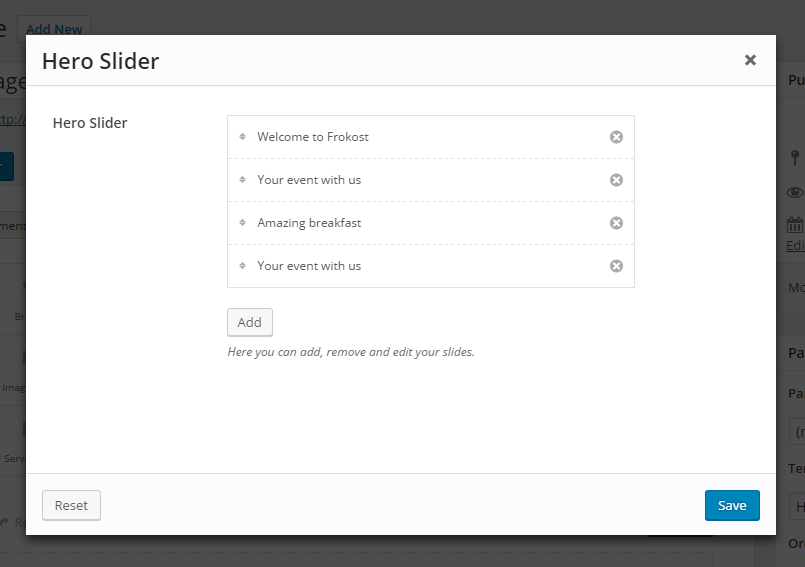
- Hero Slider Add Hero Slider
-
- ImageUpload Hero Slider Image
- TitleInput Hero Slider Title
- SubTitleInput Hero Slider SubTitle
- Button LinkInput Hero Slider Button Link
- Button TextInput Hero Slider Button Text
Front End:

Image Gallery
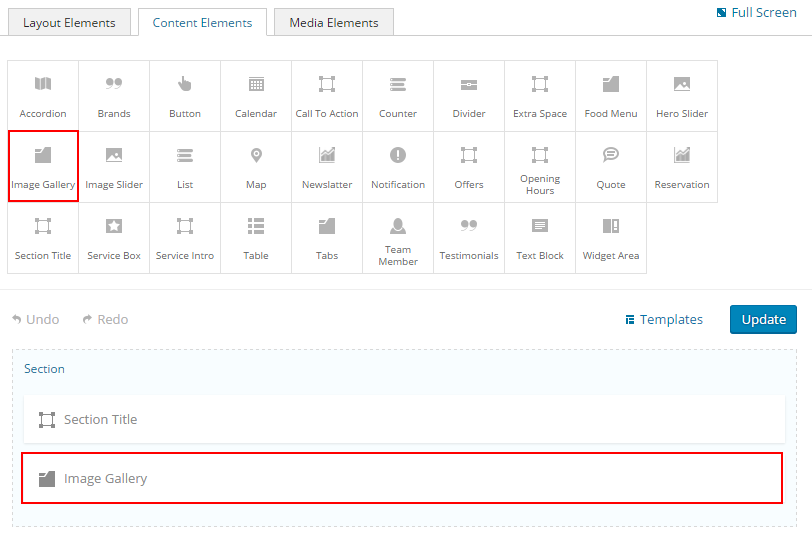
Image Gallery Options
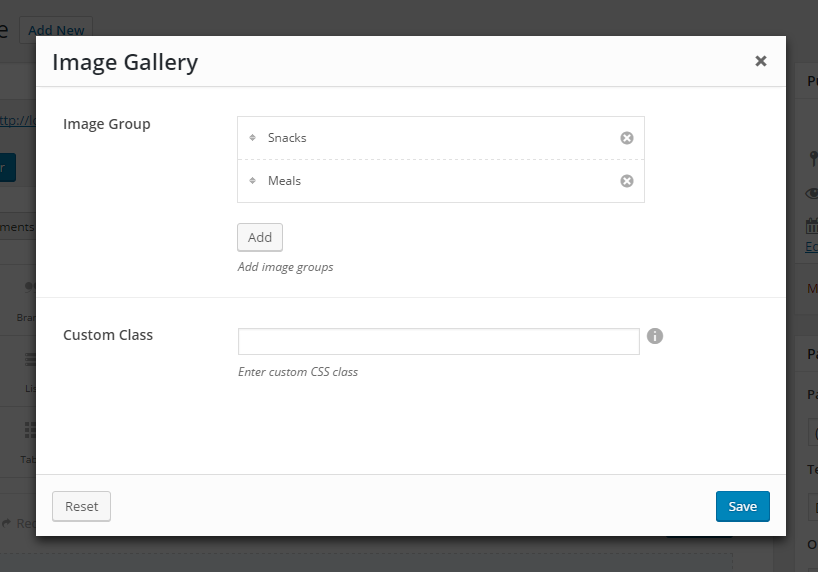
- Image Group Add Image Groups
-
- Group NameType Image Gallery Name
-
Image
- Choose an IconSelect your favorite icon
- Image TitleType image title
Front End:
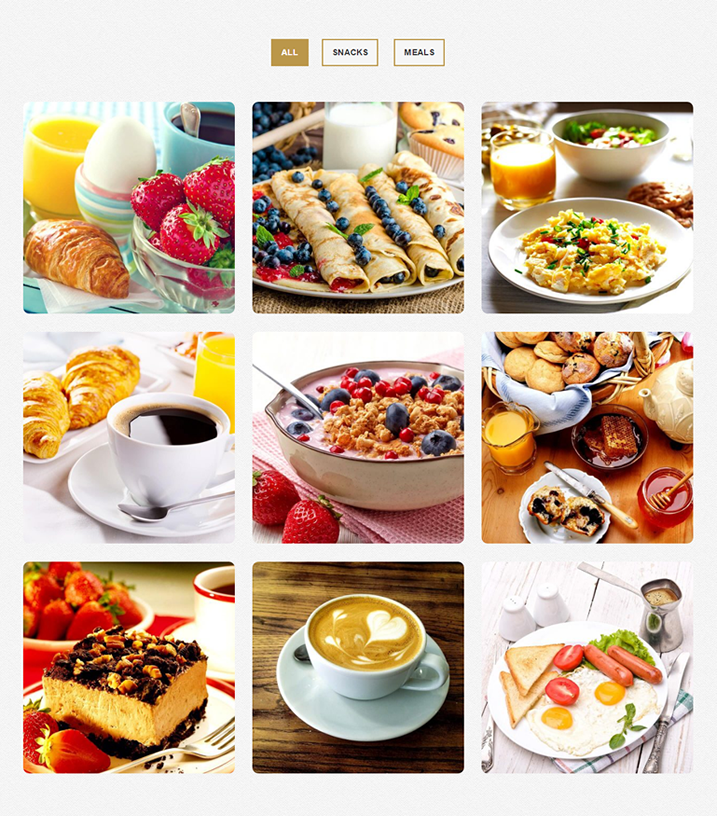
Image Slider
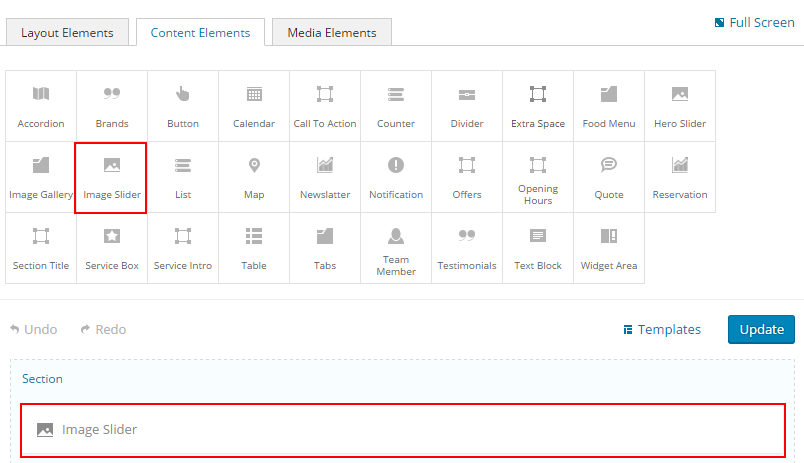
Image Gallery Options
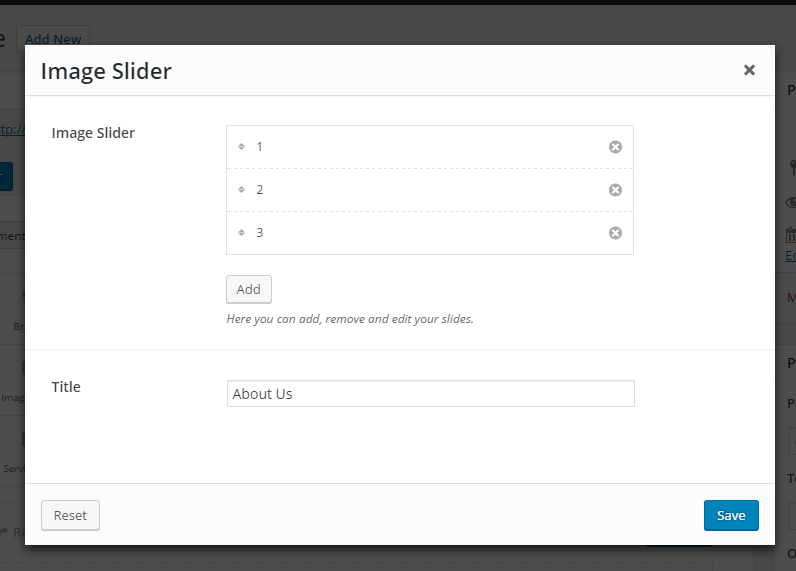
- Image Slider Add Image Slider
-
- ImageUpload your favorite image
- TitleInsert image title
- TitleType image slider title
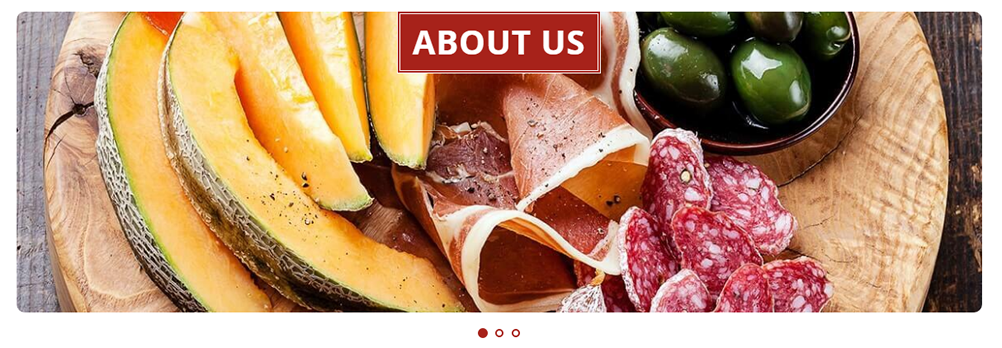
Front End:
List
This shortcode lets you add a list into your page:
Back-end

The list options
Click on the shortcode to bring up the options:
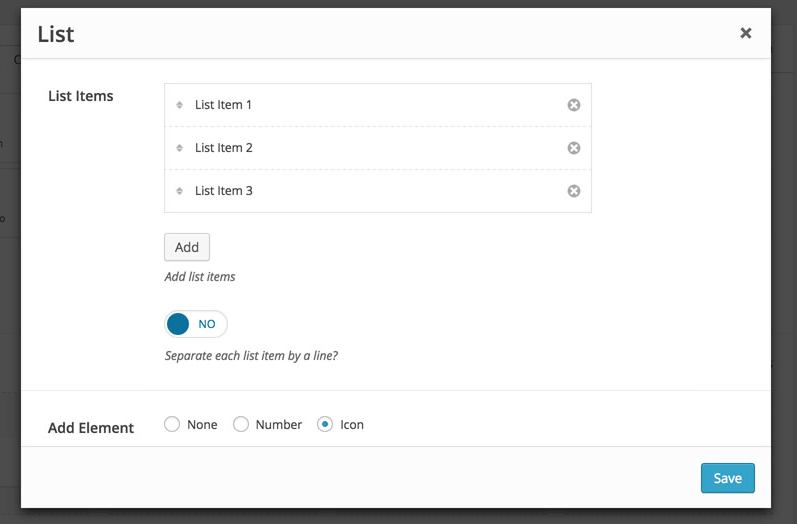
- List Items - lets you add items to your list.
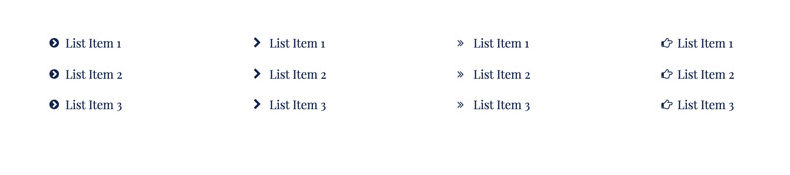
- Add Element - use this options in order to add an icon or make your list a numbered list.
Custom Class - you can use this options to add a class and further style the shortcode by adding your custom CSS in the style.css file. This file is located on your server in the /frokost-child/style.css
The list shortcode usually works best in smaller columns like 1/4 and 1/3.
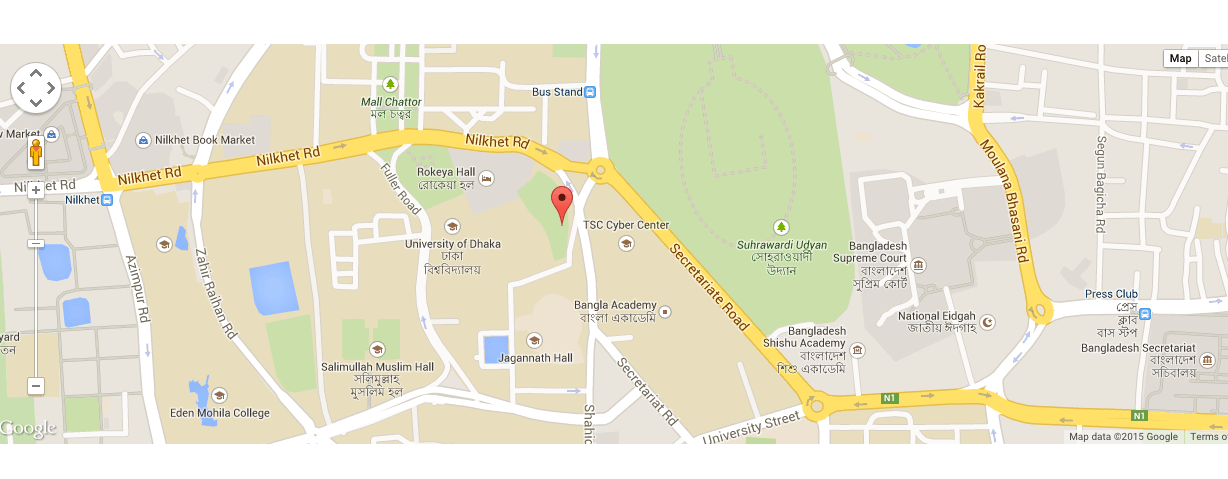
Map
This shortcode lets you add a map into your page:
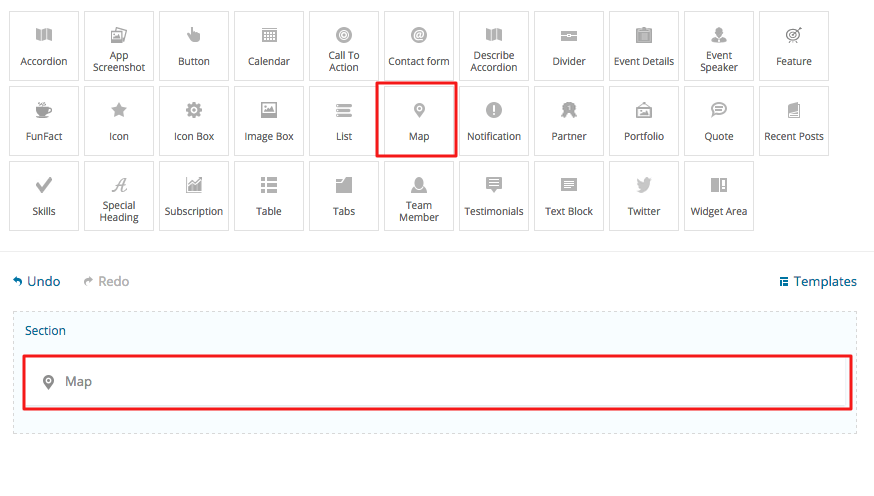
The map options
Click on the shortcode to bring up the options:
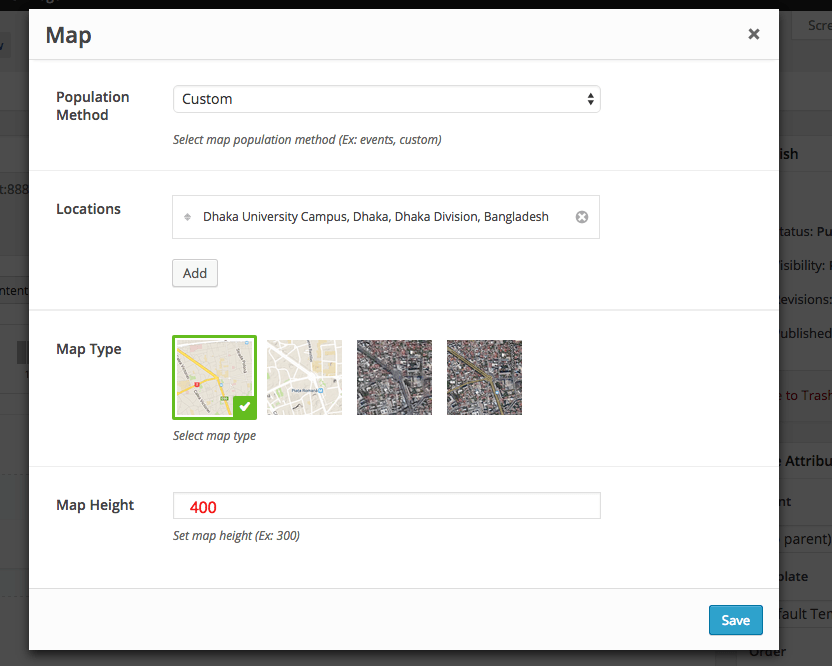
- Population Method - lets you select the population method: Custom (add custom locations on your map) or Events (display events from a specific category on your map).
- Map Type - select the default map type.
- Map Height - using this option you can set the map height in pixels.
Custom Class - you can use this options to add a class and further style the shortcode by adding your custom CSS in the style.css file. This file is located on your server in the /frokost-child/style.css
Newsletter
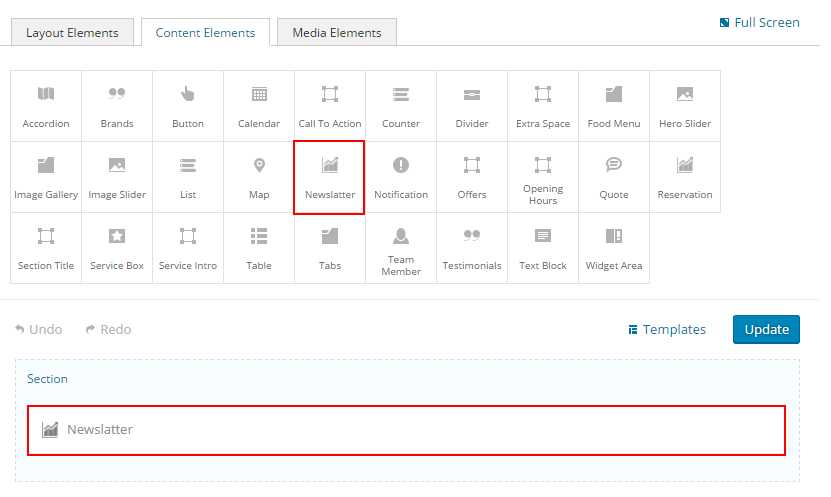
Newsletter option
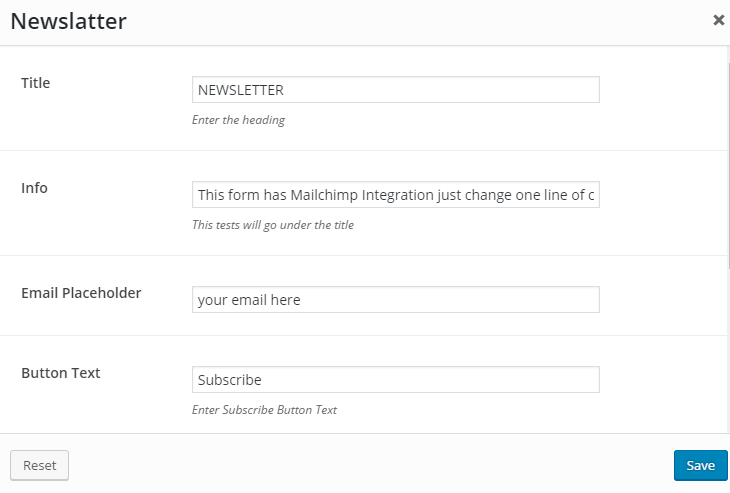
- Title There is a simple title option
- Info There is a simple description option
- Email Placeholder There is a simple Newsletter email placeholder option
- Button Text There is a simple Newsletter Button Text option
- Parallax Image There is a awesome Newsletter Parallax Image
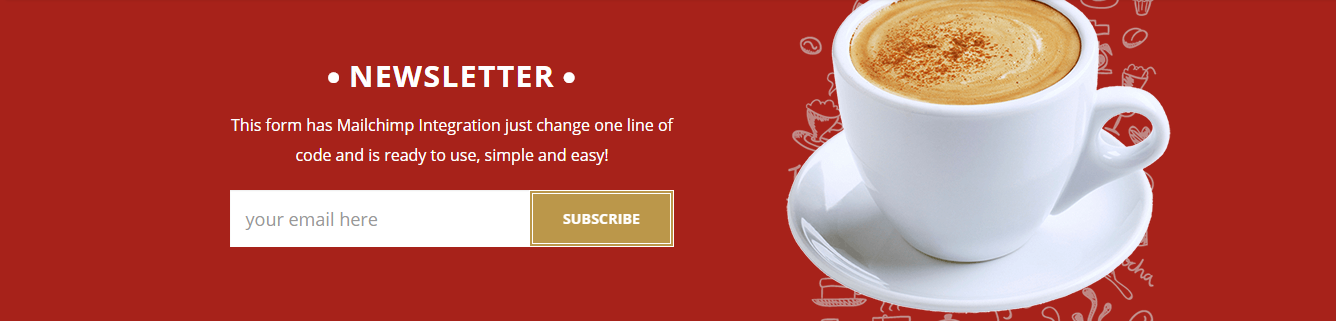
Front End:
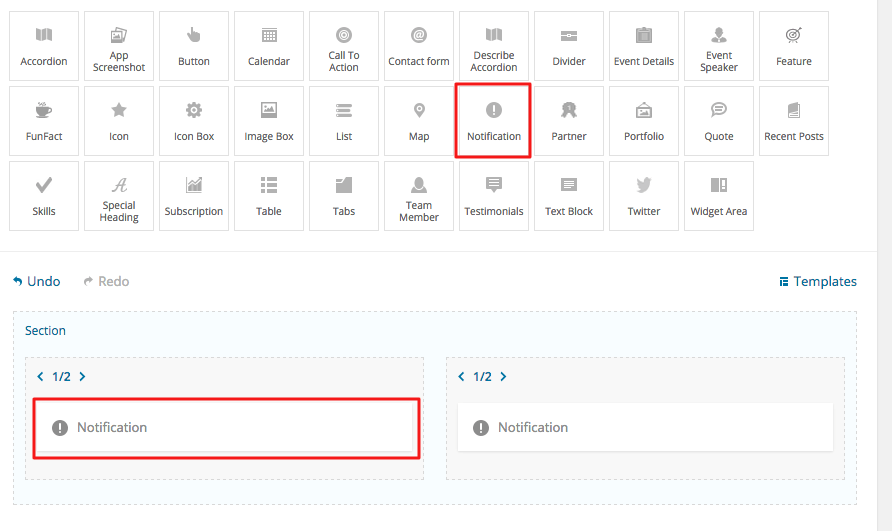
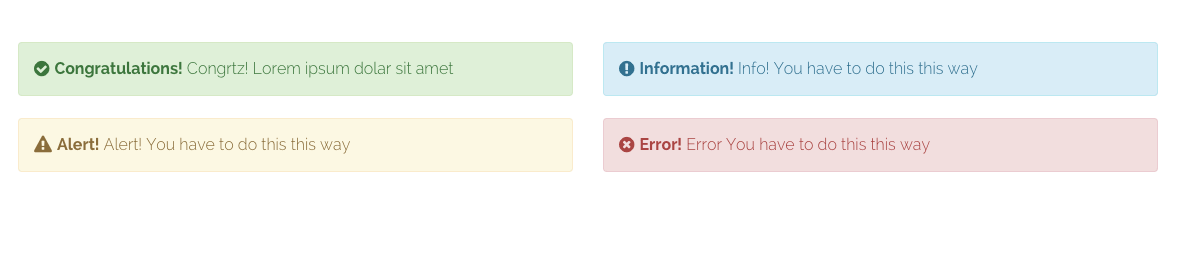
Notification
This shortcode lets you add a notification into your page:
notification options
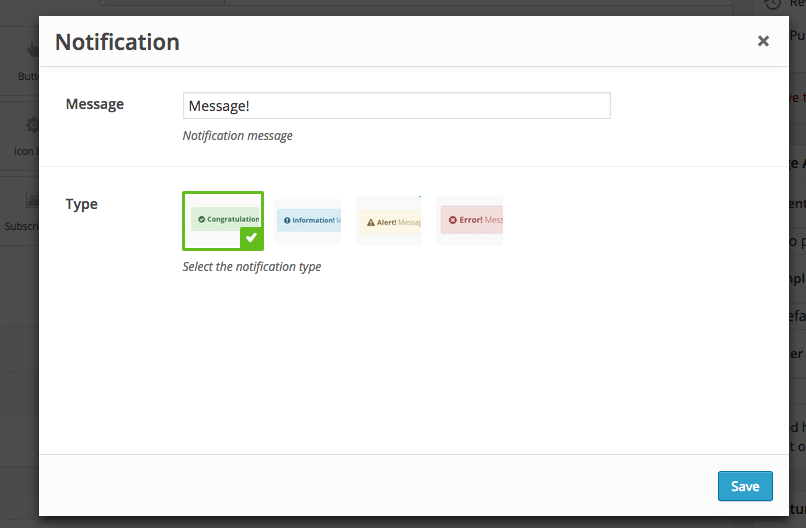
- Message - the Message of the notification box.
- Type - lets you select the notification type. Each type comes with its own preset color and icon.
Offers
This shortcode lets you add Offers to your page:
Back end
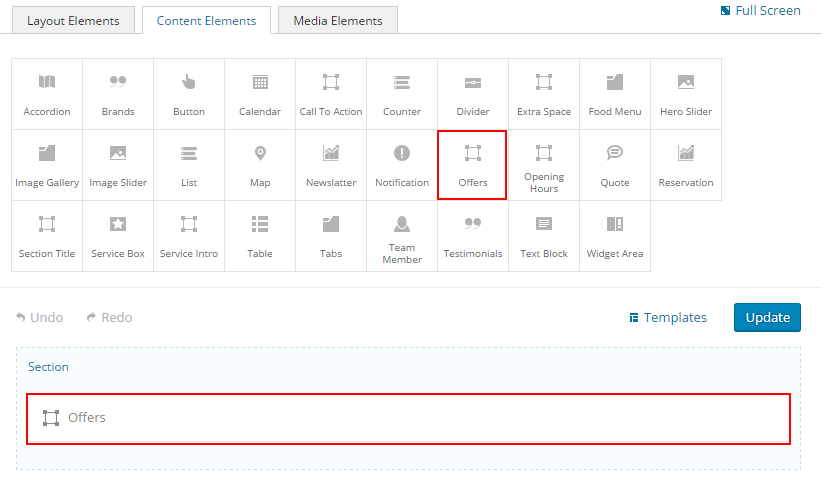
The Offers options
Click on the shortcode to bring up the options:
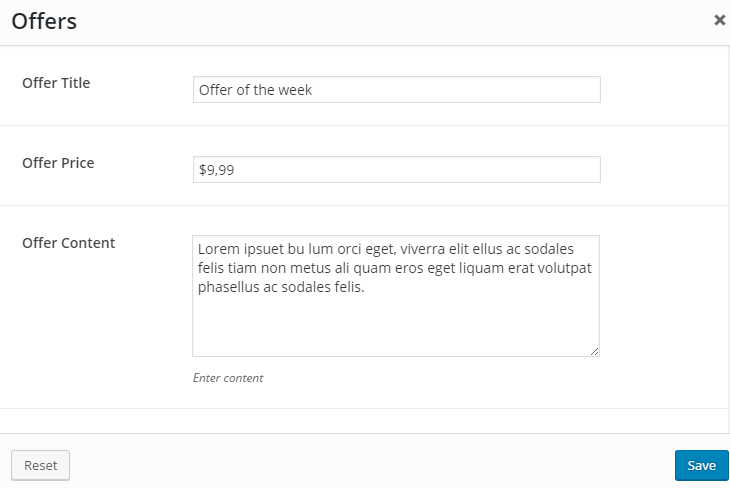
- Offer Title - lets you add Offers title
- Offer Price - lets you input Offer Price.
- Offer Content - lets you type Offer Content
- Left Image - Upload the left image
- Right Image - Upload the right image

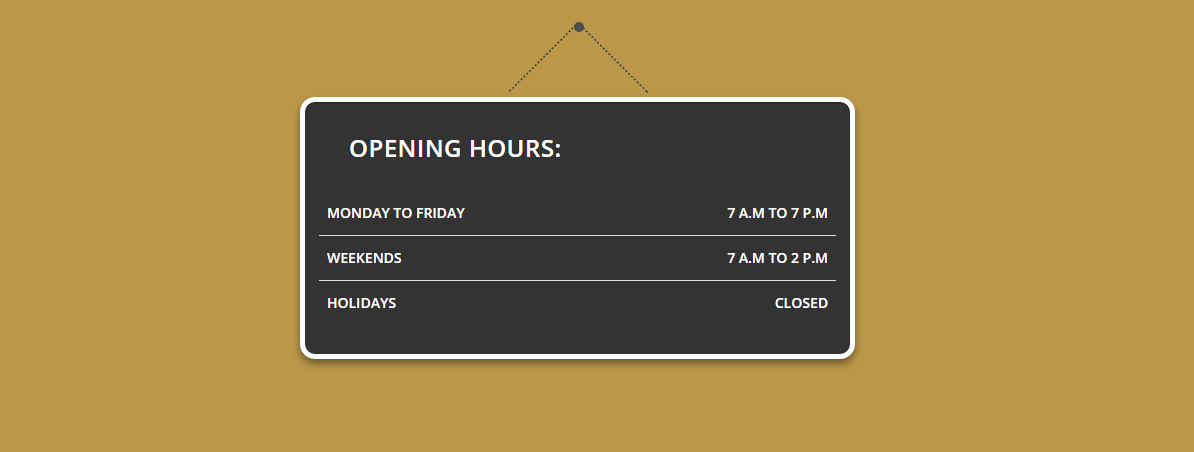
Opening Hours
This shortcode lets you add Opening Hours to your page:
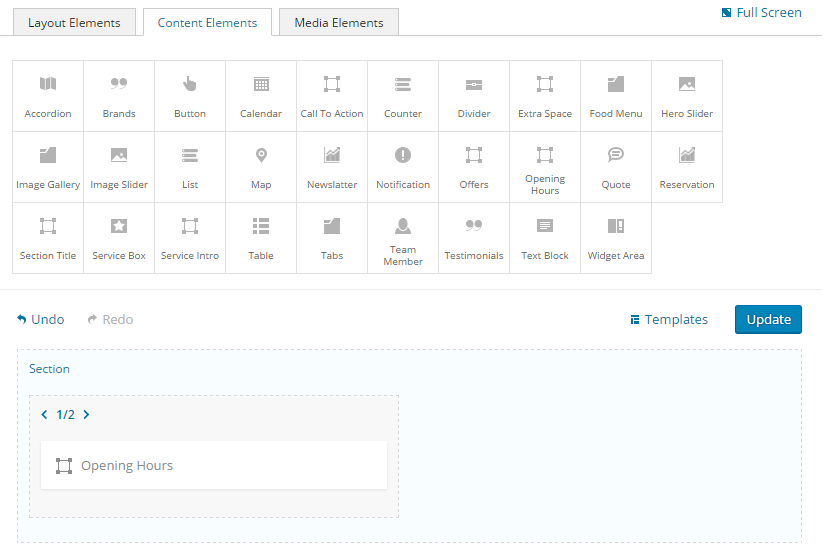
- Title - the opening hours title.
-
Tabs
- Days - the opening hours days.
- Schedule Time - the opening hours schedule time.
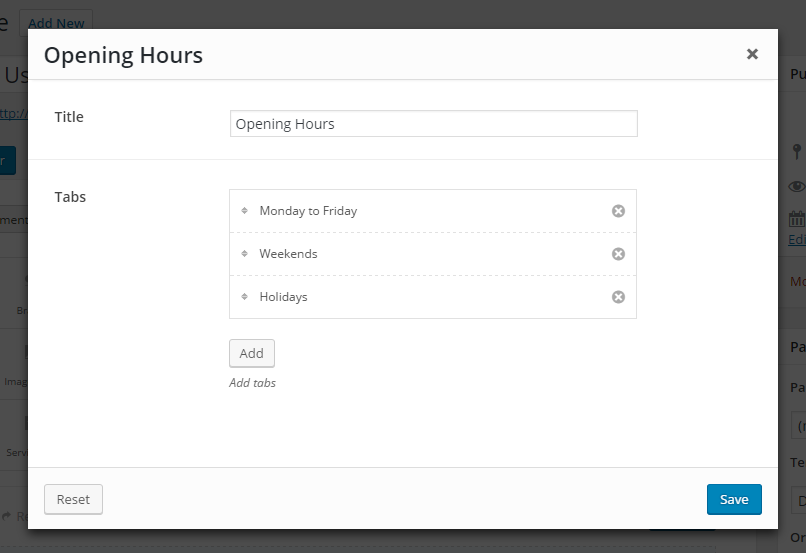
Front End
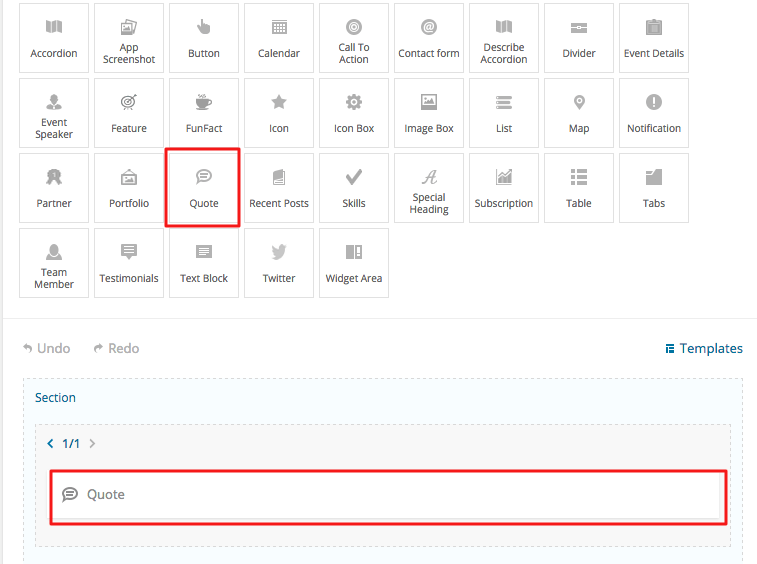
Quote
This shortcode lets you add a quote into your page:
Quote options
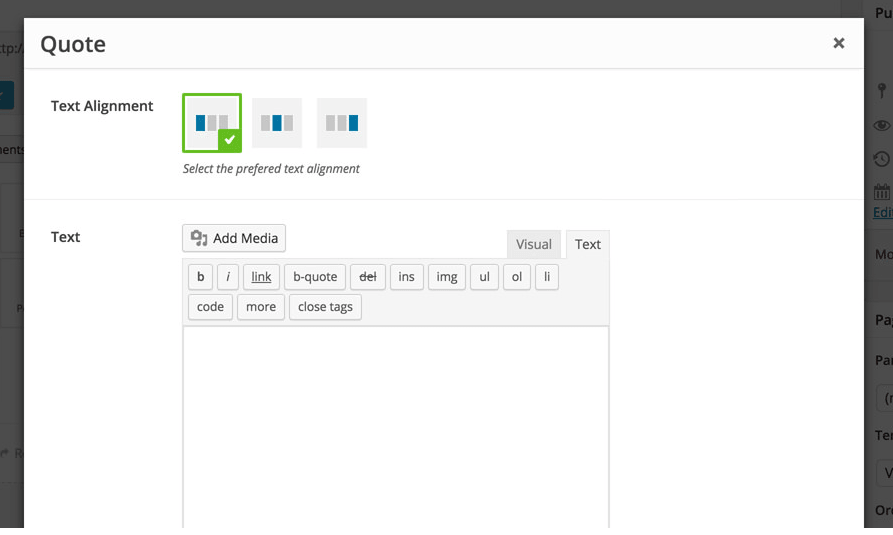
- Text Alignment - lets you select the quote's text alignment.
- Text - the quote's text.
- Author - the author.
- Name - the author name like Jhon Doe.
- Position - author job title or position
Custom Class - you can use this options to add a class and further style the shortcode by adding your custom CSS in the style.css file. This file is located on your server in the /frokost-child/style.css
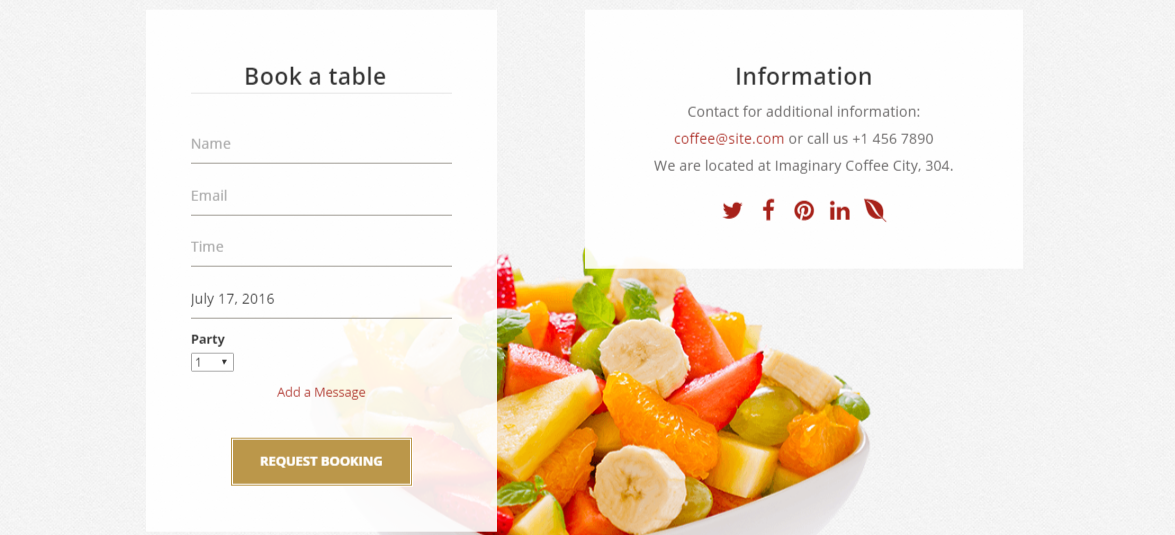
Reservation
This shortcode lets you add Reservation to your page:
Back end
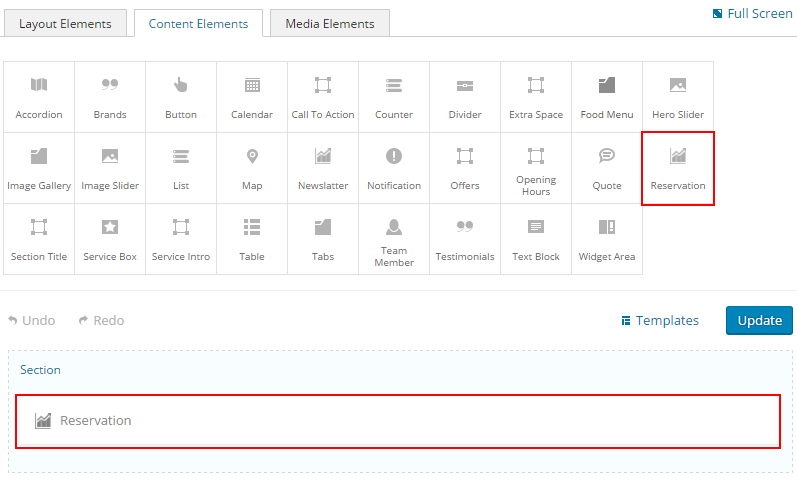
The Reservation options
Click on the shortcode to bring up the options:
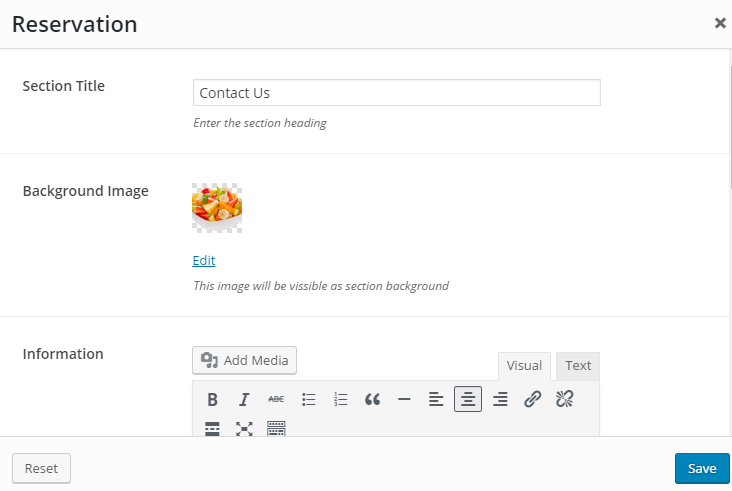
- Background Image - Upload the reservation background image.
- Information - The Reservation information text.
- Social Icons - Add the reservation Social Icons
- Reservation Shortcode - This shortcode option which is generate from caldera form.
Custom Class - you can use this options to add a class and further style the shortcode by adding your custom CSS in the style.css file. This file is located on your server in the /frokost-child/style.css
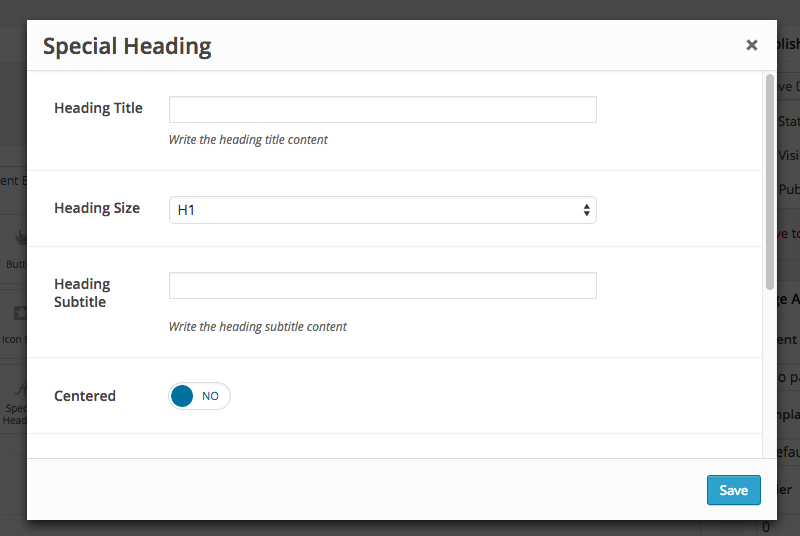
Section Title
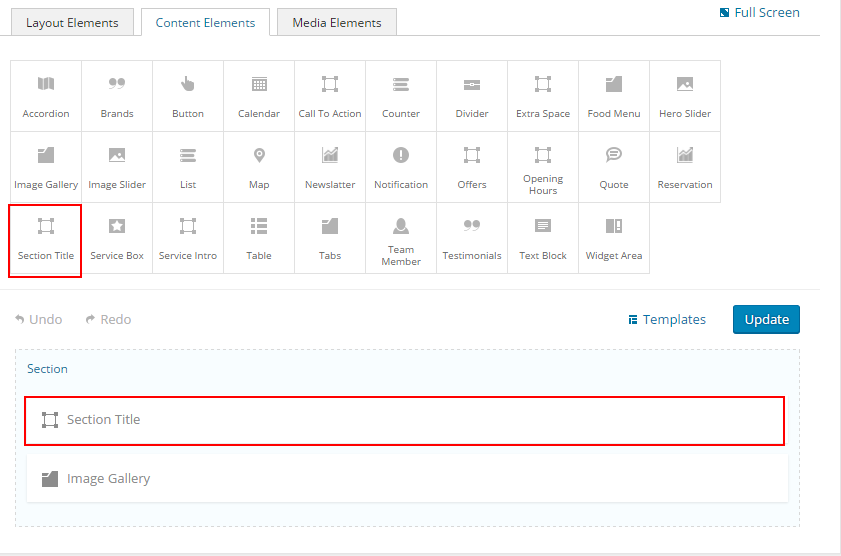
Section Title option
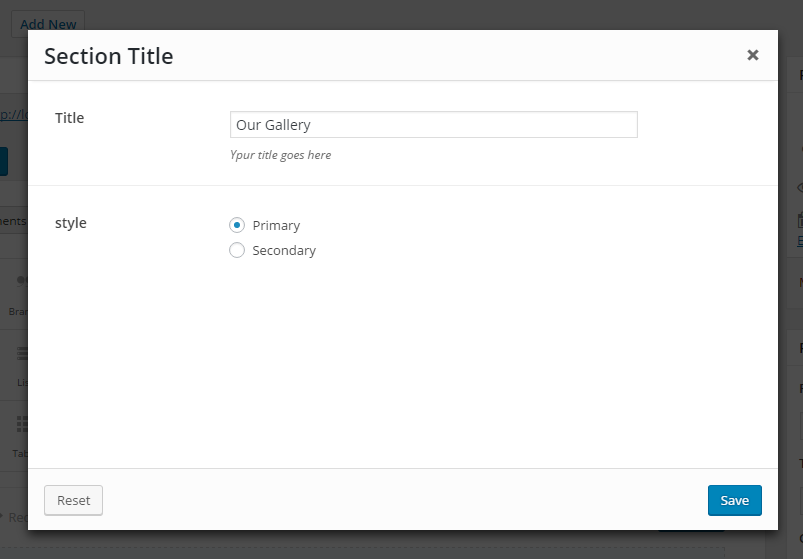
- Title - the title of section.
- Style - There are two section style you can choose one for your section heading style.
Front End:

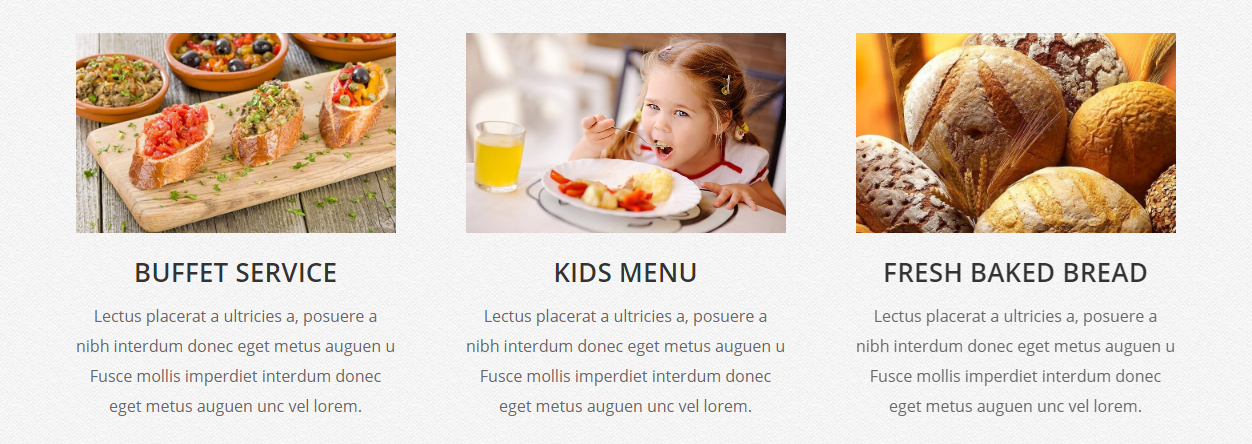
Services Box
This shortcode lets you add the Services into any page:
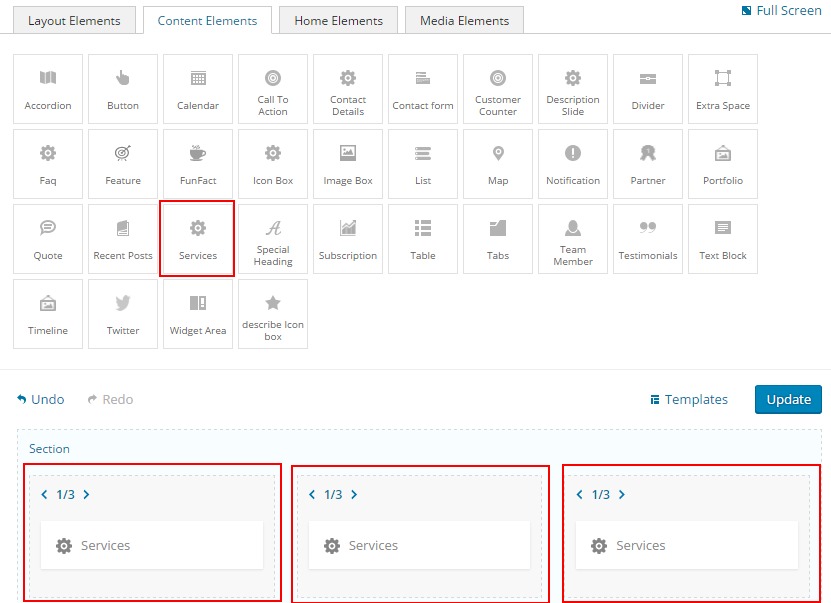
The Service Box option
Click on the shortcode to bring up the options:
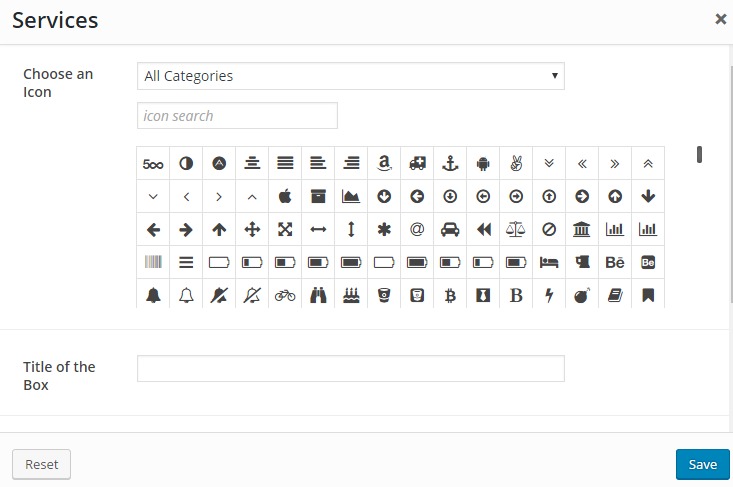
- Choose an Icon - Choose an Icon what you want
- Title of the Box - This is service title option
- Description - This is service description option
- Button - This is service description option
Service Intro
This shortcode lets you add Service Intro at your page:
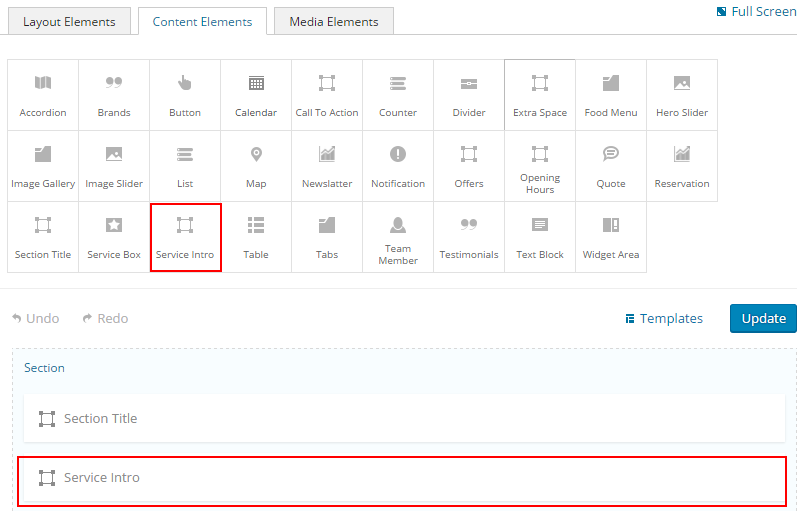
Service Intro Options
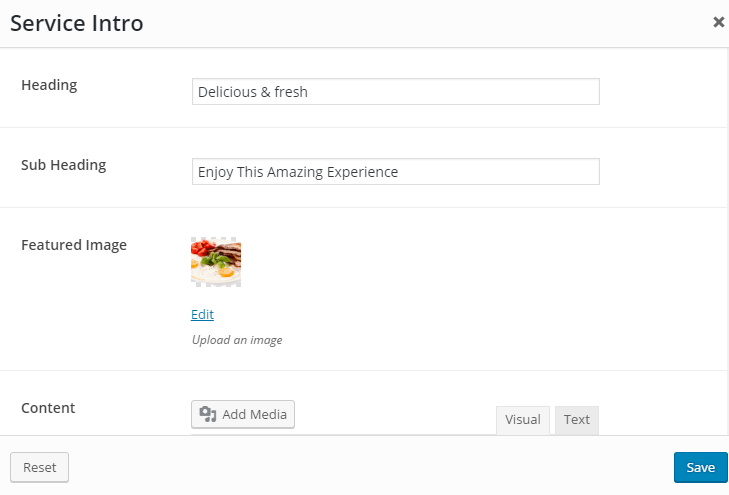
- Heading - The heading of the service intro box.
- Sub Heading - The Sub Heading of the service intro box.
- Featured Image - The Featured Image of the box
- Content - The Content of the box
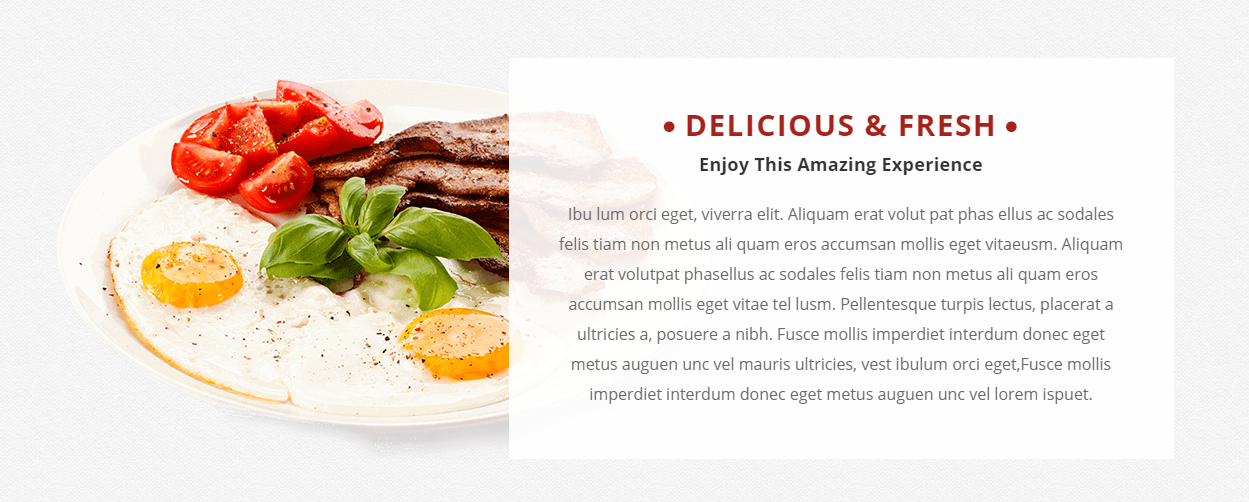
Table (Pricing table & normal table)
This shortcode lets you add a table into your page:

table options
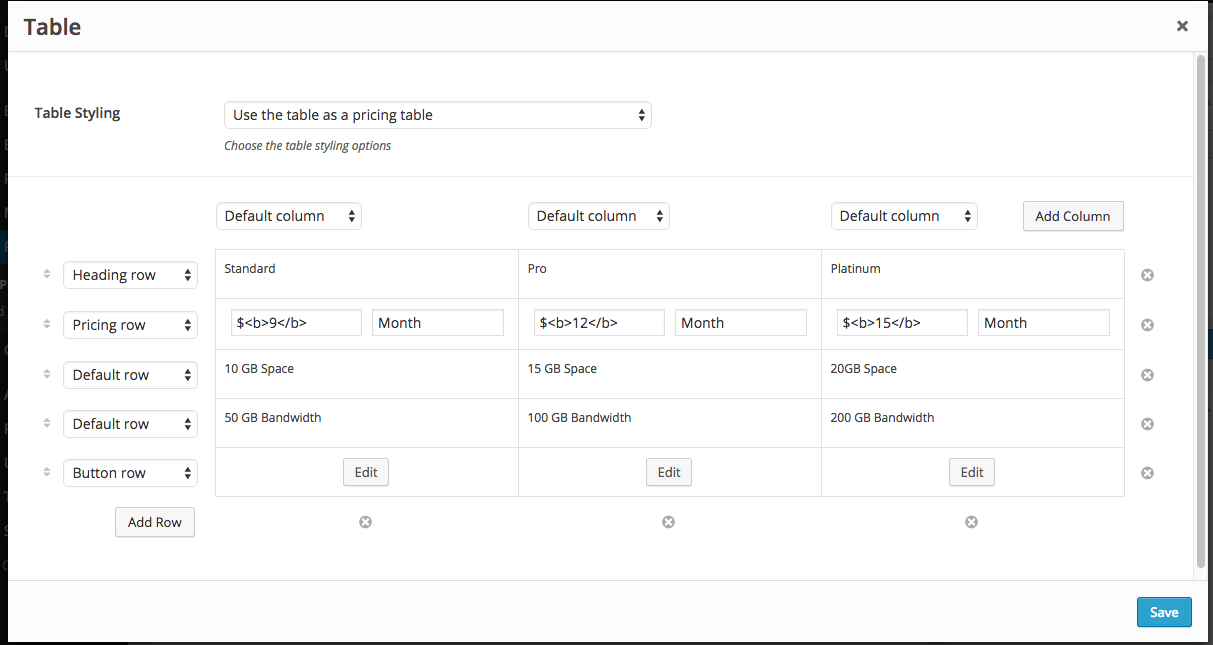
- Table Styling - lets you choose the styling of your table: pricing or tabular data table.
- Columns - you can add a maximum of 5 columns and select from the 3 preset stylings:
- Default (default styling).
- Highlight (makes the column stand out).
- Description (styles the column as a description column where you can put explanation text for the rows in the table) for each column.
- Rows - you can add as many rows as you like and they come with the following styling:
-
- Default (default styling)
- Heading (styles the row as a heading row).
- Pricing (lets you input price (price will be like $<b>9</b>) and subscription period) .
- Button (lets you add a button for every column).
- Switch (adds a YES / NO feature switch for every column).
Tabs
This shortcode lets you add tabbed content into your page:
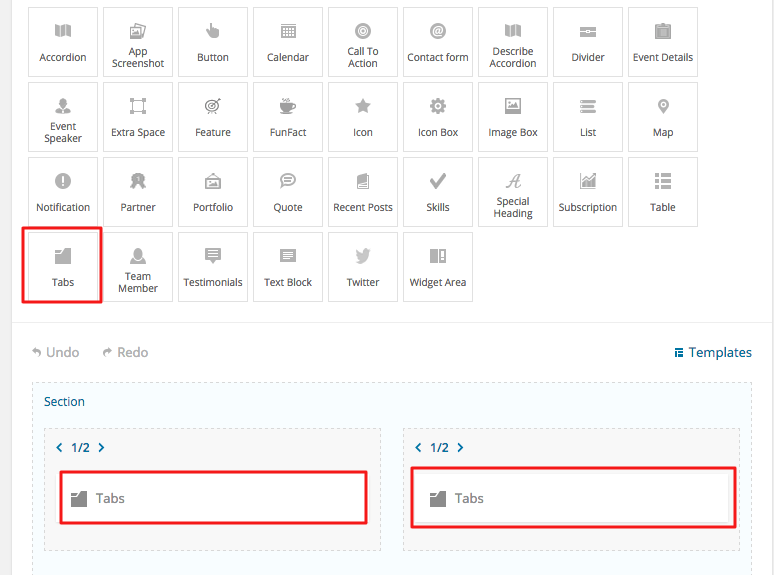
tabs options
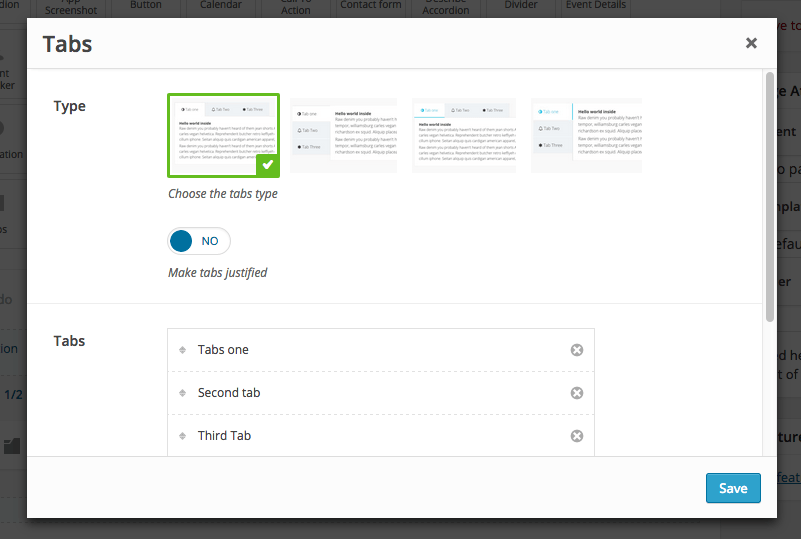
- Type - lets you select the tabs type.
- Tabs - use this option to add the actual tabs content into your shortcode. Press the Add button and another options pop up will appear where you will be able to input your tab Title and Content and even add an icon to your tab.
- Custom Class - you can use this options to add a class and further style the shortcode by adding your custom CSS in the style.css file. This file is located on your server in the /getleads-child/style.css
Team Member
This shortcode lets you add a team member into your page:
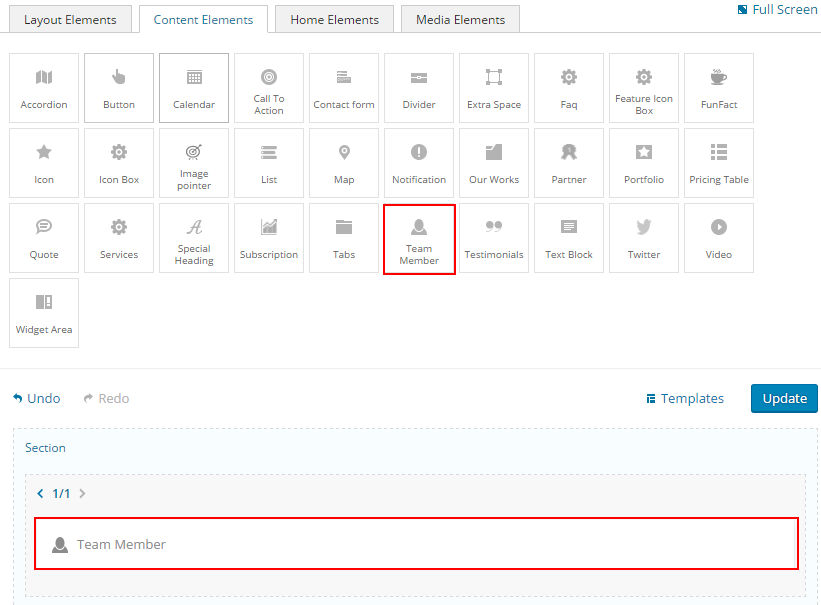
The team member options
Click on the shortcode to bring up the options:
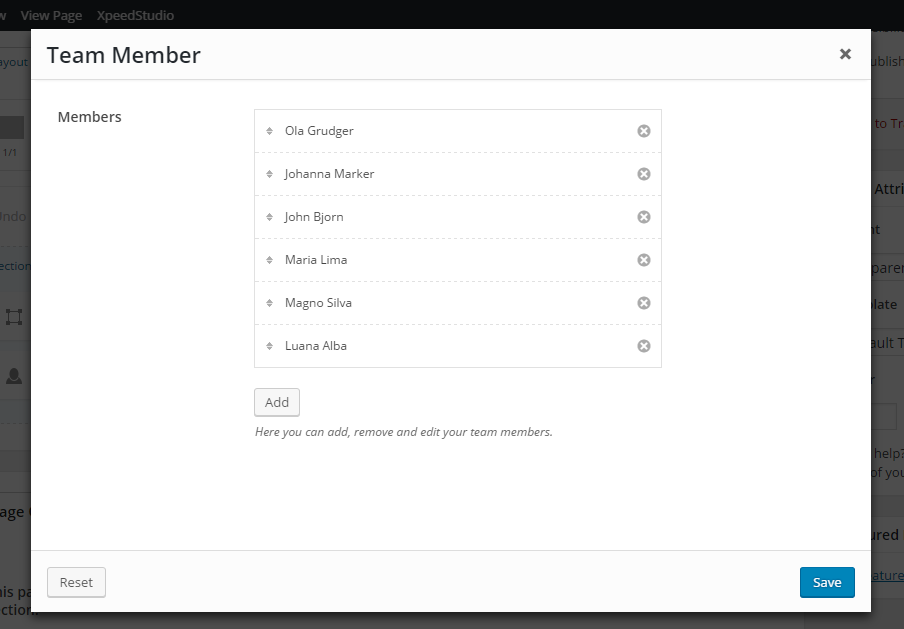
- Members -Add Team Members Information
- Photo - use this option to upload an photo for your team member.
- Member Name - the name of the team member.
- Title - the team member's job title.
- About - use this option to description for your team member.
- Social Icons - Add members social icons
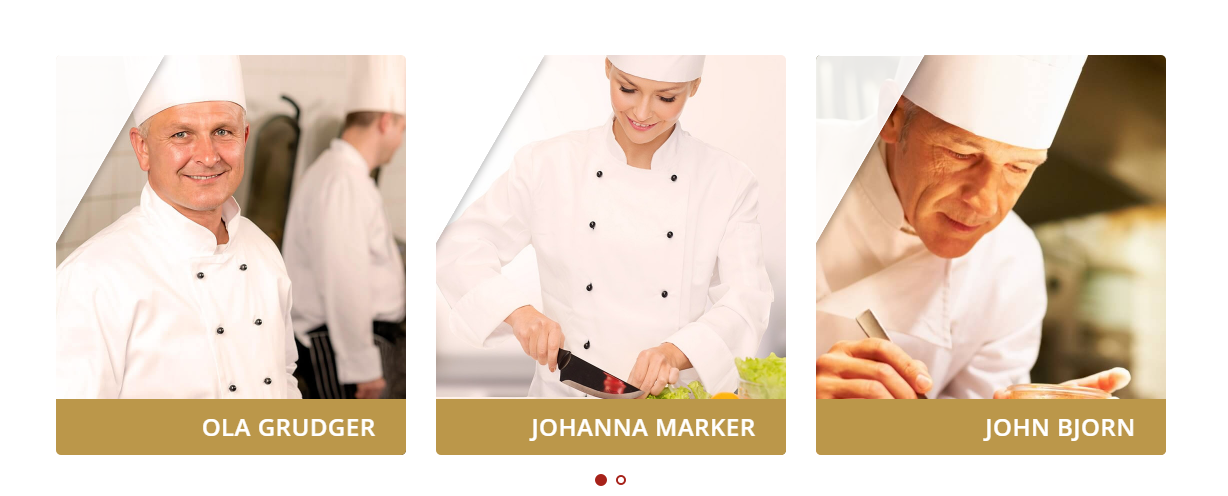
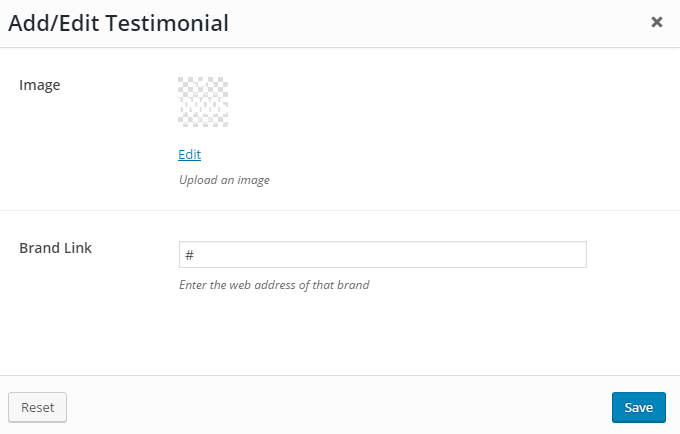
Testimonials
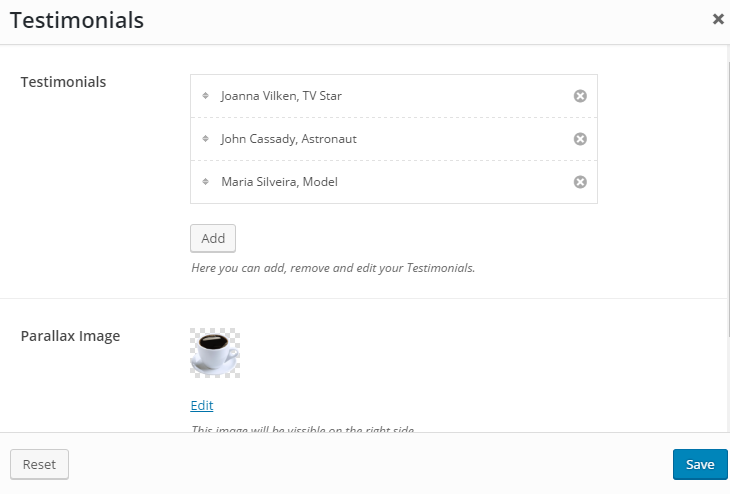
This shortcode lets you add a testimonial into your page:
Testimonials Options
-
Testimonials
- Image - Upload your testimonial favorite photo
- Author Title - Input your testimonial title
- Quote - Type your testimonial quotation
Parallax ImageUpload your testimonial parallax image.

Text Block
This shortcode lets you add a text block into your page:
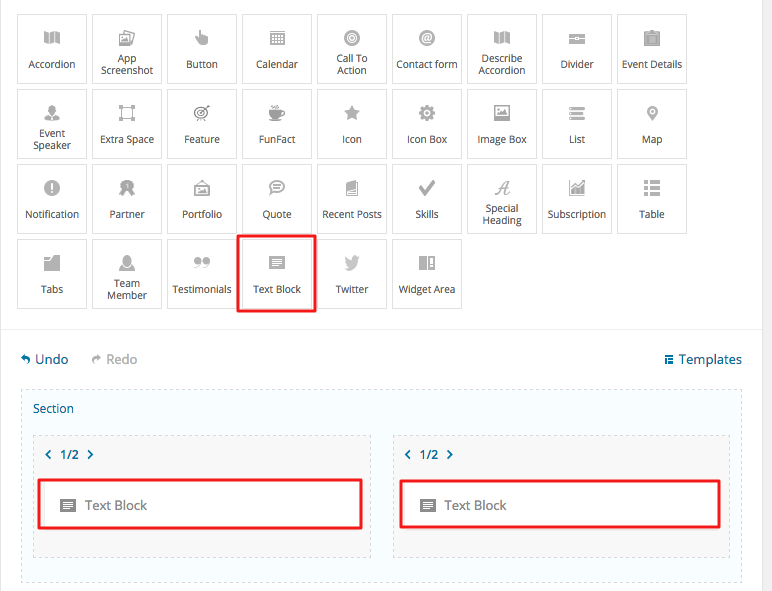
The text block options
Click on the shortcode to bring up the options:
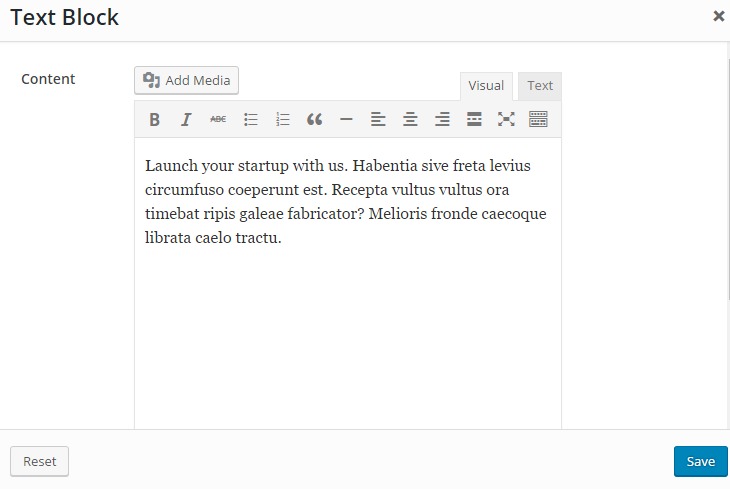
- Content - lets you enter the text content.
Widget Area
This shortcode lets you add a widget area into your page:

The widget area options
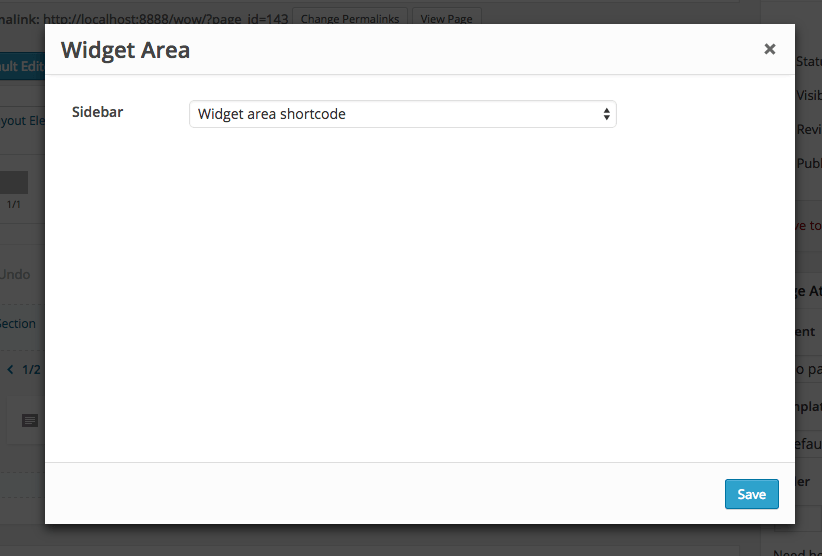
Here will see some widget section available. select Widget area shortcode. and go to appearance-> widgets add widgets in Widget area shortcode
Media Image
This shortcode lets you add an image into your page:
The image options
Click on the shortcode to bring up the options:
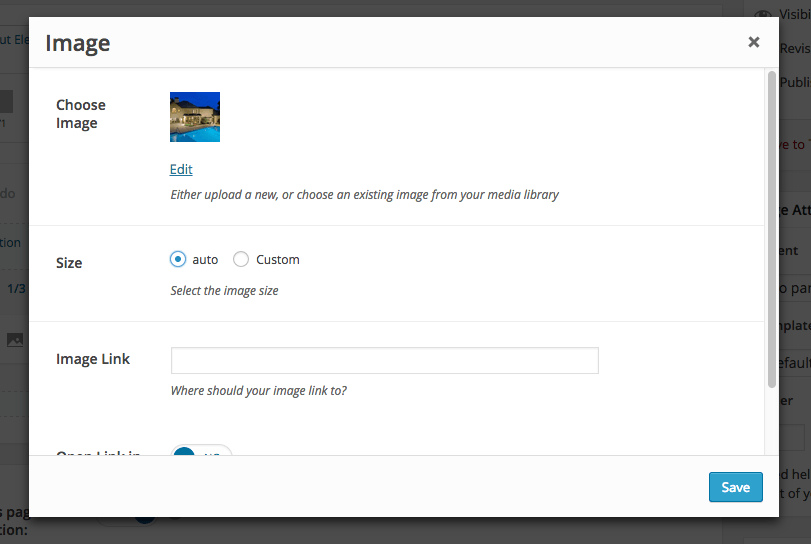
- Image - use this option to upload an image.
- Size - lets you control the size of your image.
- Image link - use this option add a link in image.
- Custom Class - you can use this options to add a class and further style the shortcode by adding your custom CSS in the style.css file. This file is located on your server in the /frokost-child/style.css
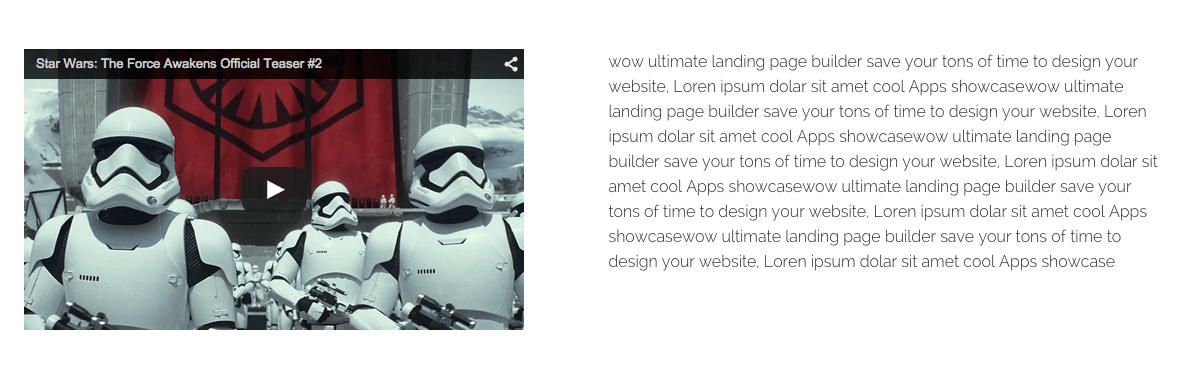
Media Video
This shortcode lets you add a video into your page:
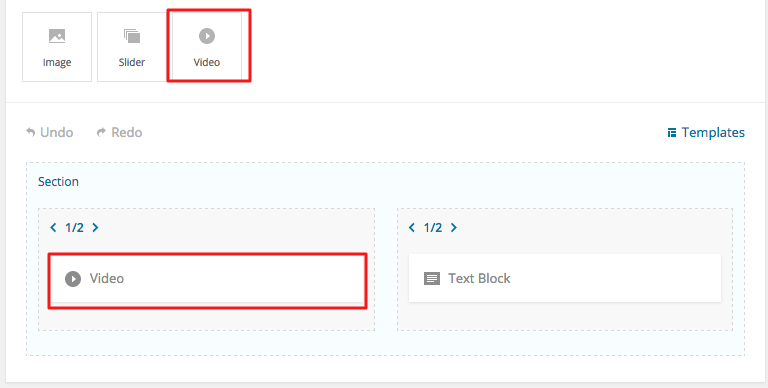
The video options
Click on the shortcode to bring up the options:
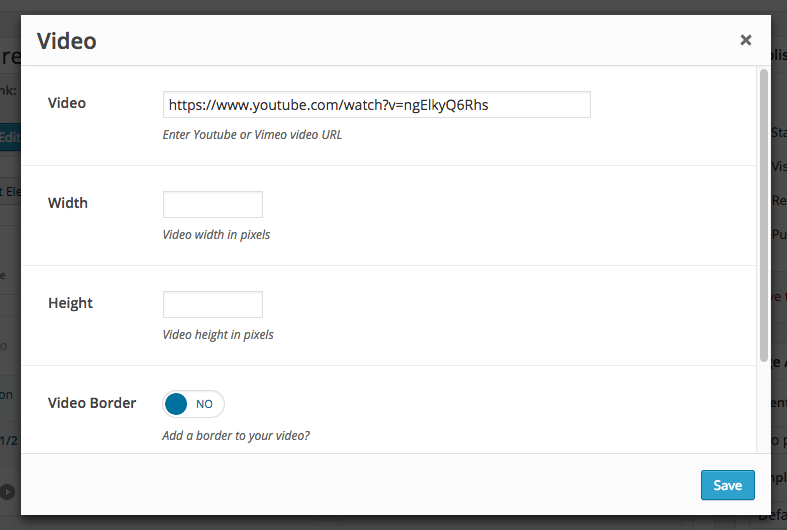
- Video - use this option to input your Youtube or Vimeo video URL.
- Width - lets you control the width of your video.
- Height - lets you control the height of your video.
- Video Border - toggles the preset video border on / off.
- Custom Class - you can use this options to add a class and further style the shortcode by adding your custom CSS in the style.css file. This file is located on your server in the /frokost-child/style.css
plugin Extensions
The Unyson framework plugin is the back bone of your WordPress theme. Without it you will not be able to use most of the features your theme comes with like visual page builder, SEO settings, analytics and more.
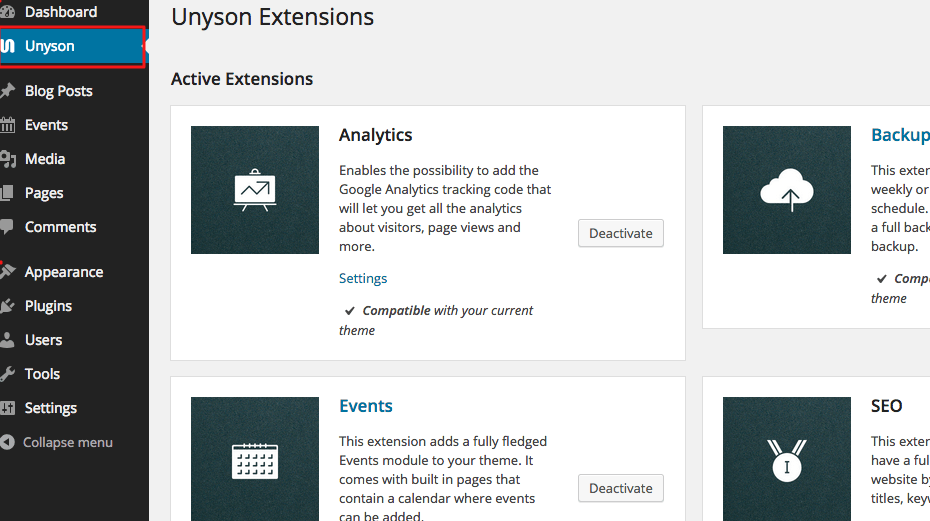
An easy way to see if Unyson is activated for your theme is to notice the Unyson entry in the sidebar:
On the Unyson page you'll see a list of extensions separated in two sections:
- Active Extensions - different extensions that are currently active and used by your theme like Analytics, Sliders, SEO, Page Builder and more.
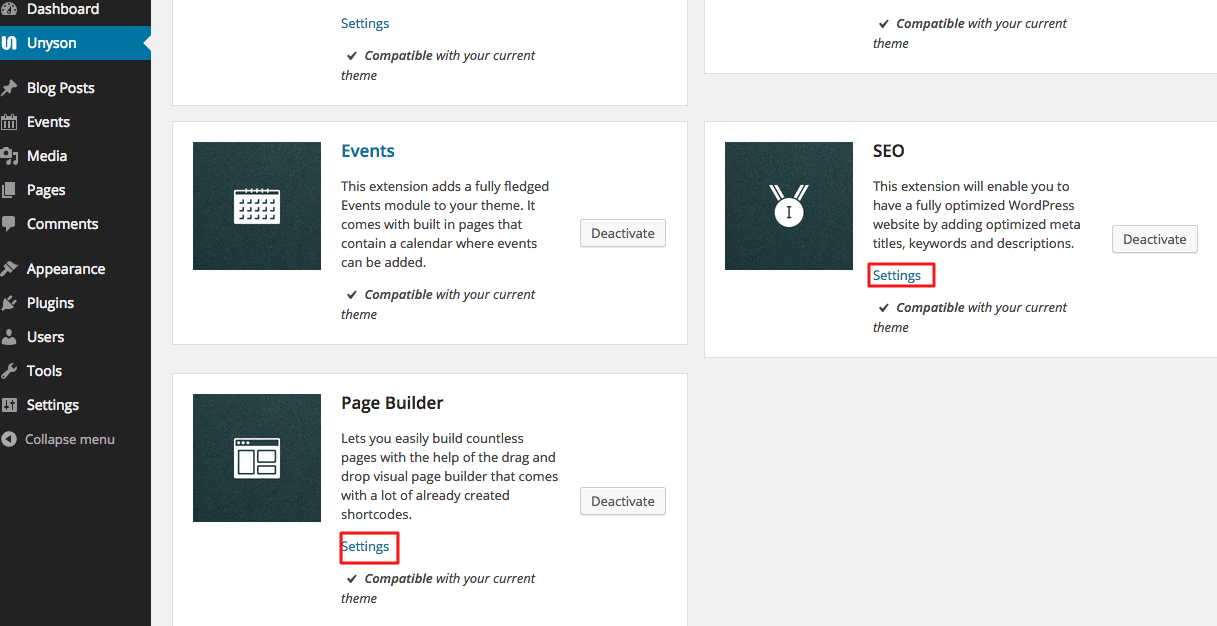
Some extensions have specific settings that can be accessed by pressing the Settings link
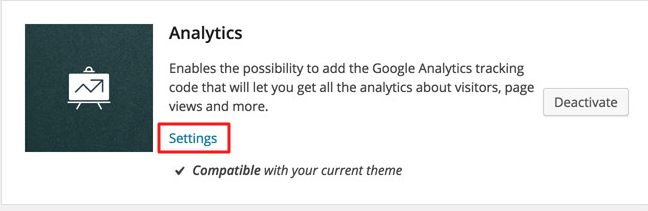
Analytics Extension Settings
The Analytics Extension enables the possibility to add the Google Analytics tracking code that will let you get all the analytics about visitors, page views and more.
- Go to Unyson, locate the Analytics extension in the list and click the Settings link.
Login into your Google Analytics account and locate the analytics code of your website. copy analytics number like UA-64586558
Copy/Paste your analytics code in the Unyson extension
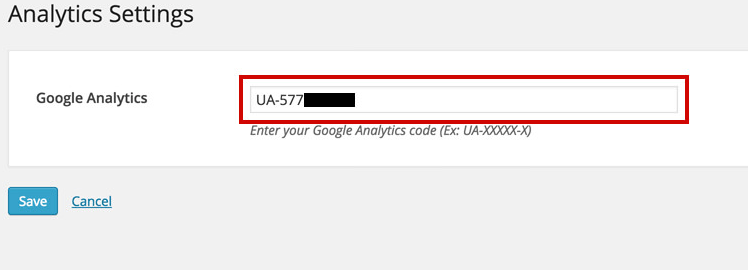
Click the Save button in order to save your changes.
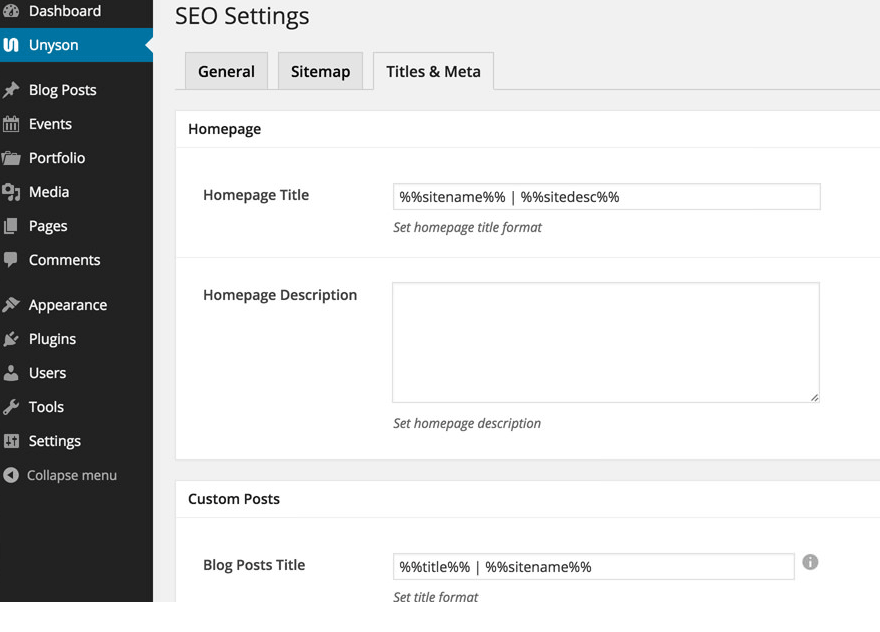
SEO Extension Settings
The SEO Extension enables you to have a fully optimized WordPress website by adding optimized meta titles, keywords and descriptions to your pages.
The SEO settings page has all the options divided in 3 main tabs:
- General - lets you control general settings about SEO, like the use of meta keywords and search engines webmaster verification codes.
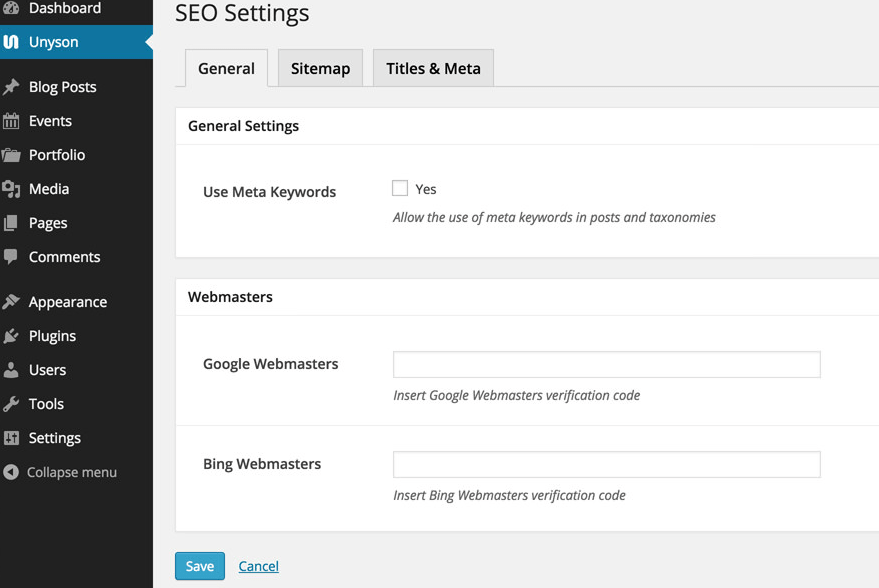
More about Google Webmaster verification codes can be found in the Google Webmaster's docs.
- Sitemap - helps you generate a sitemap that you'll submit to search engine web crawlers like Googlebot. This file tells Google and other search engines about the organization of your site content and helps web crawlers to crawl your website more intelligently.
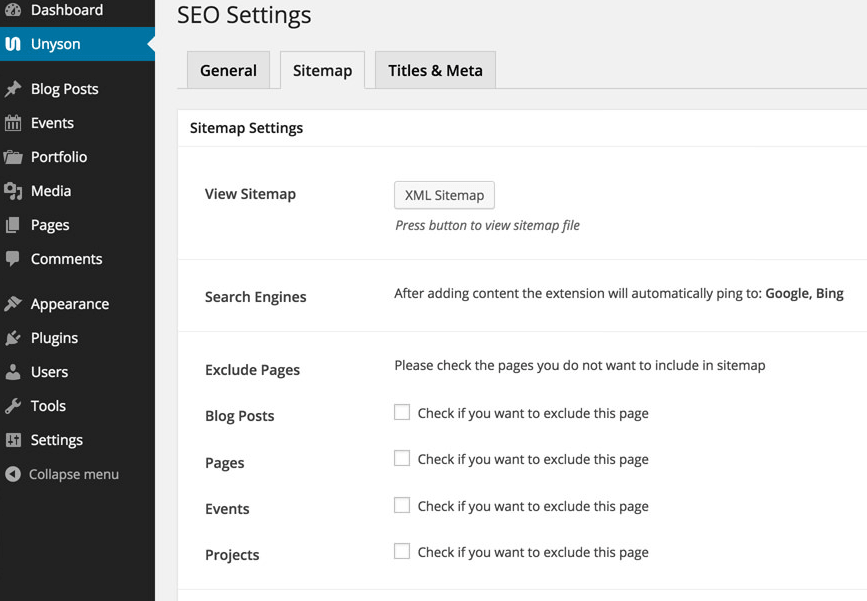
More about Google Webmaster verification codes can be found in the Google Webmaster's docs.
- Titles & Meta - lets you set different options and variables on how your titles and meta is generated for for all your pages.
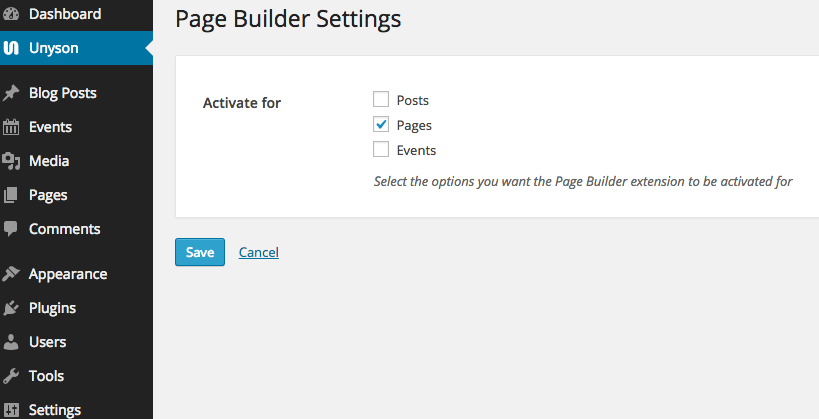
Page Builder Extension Settings
The Page Builder Extension lets you easily build countless pages with the help of the drag and drop visual page builder that comes with a lot of already created shortcodes.
Use the settings page in order to activate the page builder for different modules of your website:
Create a Backup Schedule
Creating a backup schedule is a must and you should take 1 minute to create one as soon as possible. This will potentially save a lot of headache and time along the road. Create a back up schedule by following these steps:
- Go to Tools > Backup.
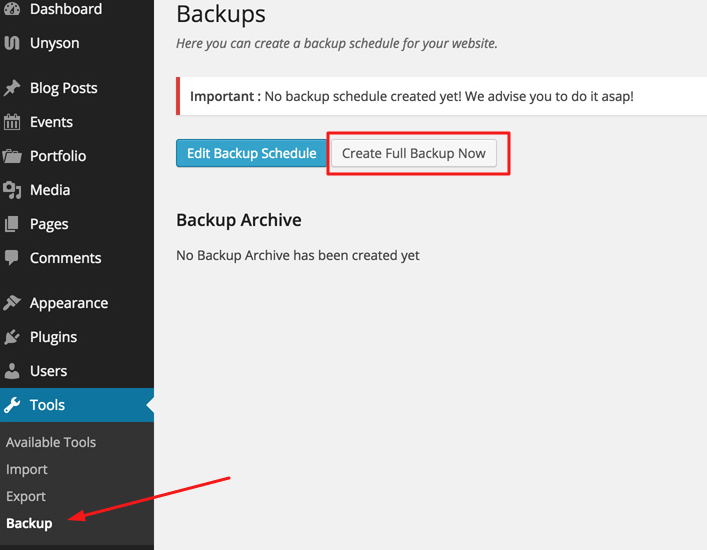
- Cilck the Create Backup Schedule button to bring up the options pop-up.
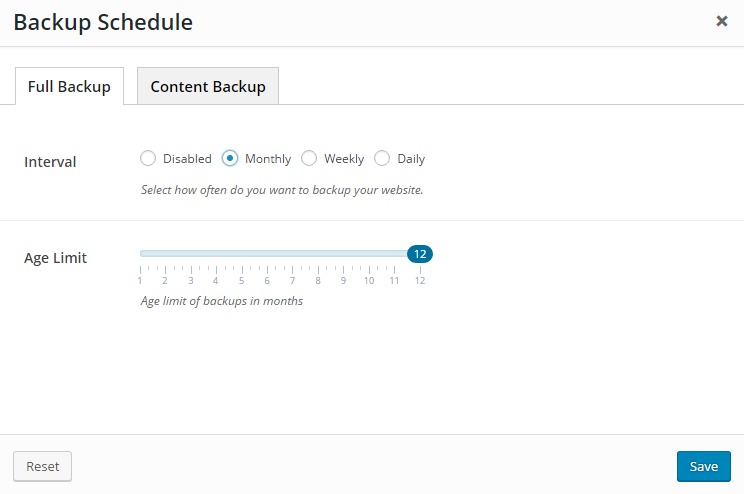
You can set up 2 different backup schedules:
- Full Backup - creates a full back of all your files including the data base.
- Content Backup - creates a backup for your content only.
Because a website doesn't change that much from day to day or even from week to week it is advisable to set up a longer period for the full back up and a shorter one for the data base backup. For example you can set a monthly full backup and a weekly data base backup, but this largely depends on how often your website changes. If you have a news website for example and you post articles every day, you'd want a shorter backup interval.
Each backup type comes with the same options:
Backup Interval - where you select how often do you want to backup your website. The options are: Disabled, Monthly, Weekly and Daily.
Backup Age Limit - lets you set the age limit of backups in days. After the days pass the backup will be deleted from the server.
Keep the age limit for you backups higher then the backup interval in order to give the system time to make another backup before the old one is deleted. In this way you ensure you have a back up in case of a crash. More over make a habit of downloading a full backup on your computer (once a month).
Make a habit of downloading a full backup on your computer from time to time. If something happens with your server it's possible to lose the backups as well (because they are stored locally on your server).
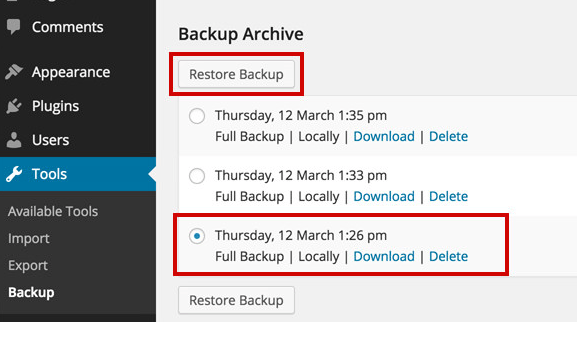
How to Create a Full Backup and Restore a Previous One
You can create or restore a backup of your website at any time by following the next steps:
- Go to Tools > Backup.
- Cilck the Create Full Backup Now button in order to create a full back on the spot. This might take a minute or two, please be patient.
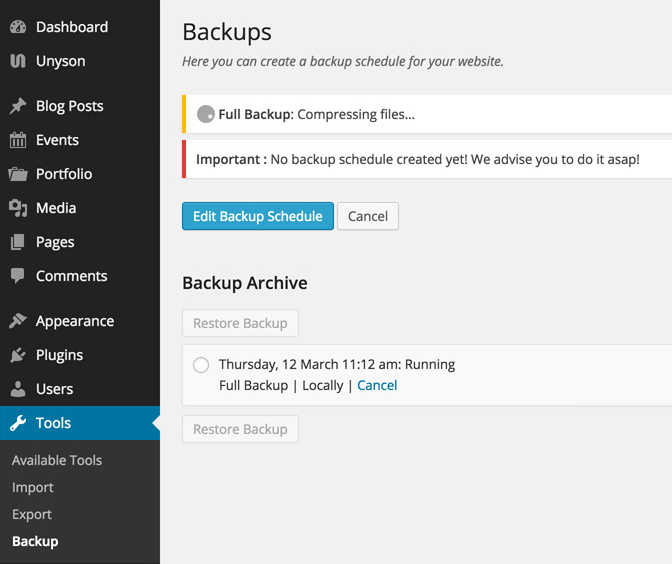
All the backups made are listed down in the page.
- Restore one of the backups at any given time, by selecting the one you want and clicking the Restore Backup button
Credits
The Plugins/Components that were used to make this theme:
- Bootstrap
- Ajax chimp
- Unison Framework
- jquery.countdown
- fw-form-helpers
- gmap
- jquery.animateNumber.min
- jquery.magnific-popup.min
- masonry.pkgd.min
- retina.min
- placeholders.min
- jquery.localScroll
- jquery.scrollTo
- modernizr-2.8.3
- owl.carousel
- smoothscroll
- tweet-featcher
- waypoints
Video Background Used:
icons Used:
Image used
Special Thanks to:
Personal images used in demo, and for demo content themeforest assets library.
Once again, thank you so much for purchasing our theme. As we said at the beginning, we are glad to help you if you have any questions relating to this theme. Just contact us via email at [email protected]. And please do not forget to rate this theme! :)
XpeedStudio